Do you ever have one of those days where you need a little chocolatey, crunchy, peanut buttery pick-me-up? I know I do. It’s usually around 3 PM when the afternoon slump hits and my sweet tooth starts whispering. That’s when I turn to these ridiculously Easy Butterfinger Balls. They’re a nostalgic nod to the candy bar we all love, but they’re even better because you made them yourself. With just a handful of ingredients and no oven required, this recipe is my secret weapon for potlucks, quick gifts, or a sneaky treat after the kids are in bed.
Why You’ll Love These Butterfinger Balls
- Seriously Fast: From bowl to bliss in about 15 minutes. No baking means instant gratification.
- Family-Friendly Fun: Get the kids involved in rolling the balls—it’s a guaranteed messy, good time.
- Pantry Staples: You probably have most of these ingredients in your cupboard right now.
- Perfect for Gifting: Pop them in a cute box, and you’ve got a heartfelt homemade present anyone would adore.
Ingredients
PrintButterfinger Balls Recipe
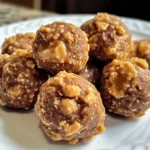
Butterfinger Balls recipe Easy no bake dessert candy Learn this tech for irresistible homemade peanut butter treats in just a few steps
- Prep Time: 15 minutes
- Total Time: 45 minutes
- Yield: Approximately 36 balls 1x
- Category: Dessert
- Cuisine: American
Ingredients
- 1 (16 ounce) jar creamy peanut butter
- 1 (16 ounce) box powdered sugar
- 1 (12 ounce) bag milk chocolate chips
- 2 tablespoons shortening
- 1 (12 ounce) bag Butterfinger baking bits
Instructions
- In a large bowl, combine the entire jar of creamy peanut butter and the box of powdered sugar. Mix until fully combined. It will be thick and crumbly but should hold together when squeezed.
- Using your hands, roll the mixture into small, one-inch balls and place them on a parchment-lined baking sheet. If sticky, refrigerate for 10-15 minutes to firm up.
- Place the tray in the refrigerator for about 30 minutes to chill the balls, making them easier to dip.
- While chilling, melt the chocolate chips and shortening in a microwave-safe bowl. Heat in 30-second intervals, stirring, until smooth.
- Dip each chilled ball into the melted chocolate using a toothpick or fork, ensuring full coverage. Let excess chocolate drip off.
- Place the dipped ball back on the parchment paper and immediately sprinkle with Butterfinger baking bits before the chocolate sets.
- Allow the chocolate to set completely. This can be sped up by refrigerating the tray for 15 minutes.
Notes
A quick and easy no-bake recipe for delicious Butterfinger balls, combining creamy peanut butter, powdered sugar, and a milk chocolate coating for a perfect treat in just 15 minutes of prep time.
Nutrition
- Serving Size: Approximately 36 balls
- Calories: 180 calories
- Sugar: 20 g
- Fat: 10 g
- Carbohydrates: 22 g
- Fiber: 1 g
- Protein: 4 g
- 1 (16 ounce) jar creamy peanut butter
- 1 (16 ounce) box powdered sugar
- 1 (12 ounce) bag milk chocolate chips
- 2 tablespoons shortening
- 1 (12 ounce) bag Butterfinger baking bits
Equipment You’ll Need
- Large mixing bowl
- Baking sheets
- Parchment paper or wax paper
- Microwave-safe bowl or double boiler
- Toothpicks or forks for dipping
How to Make Butterfinger Balls: Step-by-Step
My youngest daughter thinks this part is magic, and honestly, I do too. It’s so simple, but the result feels so special.
- In a large bowl, combine the entire jar of creamy peanut butter and the box of powdered sugar. Mix it together until it’s fully combined. It will be thick and a bit crumbly, but it should hold together when you squeeze it.
- Using your hands, roll the mixture into small, one-inch balls and place them on a baking sheet lined with parchment paper. If the mixture is too sticky, you can pop it in the fridge for 10-15 minutes to firm up.
- Once all the balls are rolled, place the tray in the refrigerator for about 30 minutes. This chilling step is crucial—it makes them much easier to dip later!
- While the balls are chilling, melt your chocolate. In a microwave-safe bowl, combine the chocolate chips and shortening. Heat in 30-second intervals, stirring in between, until the mixture is smooth and melted. The shortening helps thin the chocolate for a perfect, smooth coating.
- Remove the chilled peanut butter balls from the fridge. Using a toothpick or a fork, dip each ball into the melted chocolate, ensuring it’s completely covered. Let any excess chocolate drip off.
- Place the dipped ball back onto the parchment paper and immediately sprinkle the top with the Butterfinger baking bits before the chocolate sets. Repeat with all balls.
- Allow the chocolate to set completely. You can speed this up by placing the tray back in the fridge for about 15 minutes.
Tips & Tricks for the Best Butterfinger Balls
I’ve made these more times than I can count, and here’s what I’ve learned:
- Sticky Situation: If your hands are getting too messy while rolling, a light dusting of powdered sugar on your palms works wonders.
- Chocolate Choices: Not a milk chocolate fan? Feel free to use semi-sweet or dark chocolate chips for a richer flavor. For a true shortcut, you can even use pre-made chocolate candy coating.
- The Crunch Factor: If you can’t find the Butterfinger baking bits, you can crush up regular Butterfinger candy bars. Just place them in a zip-top bag and roll with a rolling pin.
- Make-Ahead Magic: These are fantastic for making ahead. They store beautifully in the fridge for up to two weeks (if they last that long!).
What to Serve With Your Treats
These little balls of joy are perfect all on their own with a cold glass of milk. But if you’re crafting a full dessert spread for a party, they pair wonderfully with other easy no-bake treats like my Cheesecake Parfait. They also make a great addition to a holiday cookie platter!
Frequently Asked Questions
Can I use natural peanut butter?
I wouldn’t recommend it for this recipe. Natural peanut butter tends to be oilier and can make the mixture too greasy and difficult to hold its shape. A standard creamy peanut butter like Jif or Skippy works best.
How should I store these?
Store your Butterfinger balls in an airtight container in the refrigerator. The cool temperature keeps the chocolate firm and the peanut butter center perfectly chewy. They’ll stay delicious for up to two weeks.
Can I freeze Butterfinger Balls?
Absolutely! These freeze beautifully. Place them in a single layer in a freezer-safe container, separated by parchment paper. They can be frozen for up to 3 months. Just thaw in the fridge before serving.
My chocolate is clumpy. What did I do wrong?
Chocolate can be finicky! It might have gotten too hot. The key is to melt it slowly using short bursts in the microwave or a double boiler. If it seizes up, you can try stirring in a tiny bit more shortening to smooth it out.
There you have it—the easiest, most addictive treat that looks like you spent hours in the kitchen. Every time I bring these to a gathering, they disappear in minutes, and I always get asked for the recipe. I love that something so simple can bring so much joy. It’s a reminder that the best things in life don’t have to be complicated. So, the next time that sweet craving calls, I hope you whip up a batch of these Easy Butterfinger Balls and make a few delicious memories of your own.