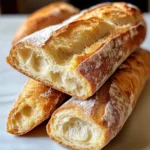
Have you ever walked past a bakery, inhaled that incredible aroma of fresh-baked bread, and felt a little pang of sadness because you thought gluten-free living meant you had to miss out? I’ve been there. For the longest time, I believed a crispy-on-the-outside, soft-on-the-inside baguette was a dream of my past. Turns out, I was so wrong. This Gluten Free French Bread Baguette is here to bring the magic of a classic bakery right into your kitchen.
This recipe is my answer to those store-bought gluten-free breads that can be dense, crumbly, and, let’s be honest, a little disappointing. We’re creating something special here—a loaf that’s perfectly chewy, with a golden, crackly crust that makes that satisfying crunch when you break it. It’s the perfect side for your favorite pasta dish, the foundation for an epic sandwich, or simply a vehicle for a generous swipe of good butter. Let’s bake some joy .
Why You’ll Love This Gluten Free French Bread Baguette
Trust me, this recipe is about to become a staple in your home. It’s not just about replacing gluten; it’s about creating something truly wonderful.
- Surprisingly Simple: Don’t be intimidated by bread-making! This recipe uses a straightforward method that’s perfect for bakers of all levels.
- Incredible Texture: Say goodbye to gummy or dense loaves. We achieve a light, airy crumb and that classic crisp crust.
- Family-Friendly: This bread is so good, no one will guess it’s gluten-free. It’s the ultimate win for family dinners.
- Versatile & Freezer-Friendly: Make a batch and freeze the extras for quick meals later in the week.
Gathering Your Ingredients
This loaf starts with a great gluten-free flour blend. I highly recommend using a brand that includes xanthan gum, like Bob’s Red Mill 1-to-1 Gluten-Free Baking Flour, for the best results.
- 2 ½ cups (350g) high-quality gluten-free bread flour blend
- 2 tsp instant yeast
- 1 tbsp sugar
- 1 ½ tsp salt
- 1 cup warm water (around 110°F)
- 2 large egg whites, lightly beaten
- 1 tbsp olive oil
- 1 tbsp apple cider vinegar
Step-by-Step Instructions
Let’s turn these simple ingredients into a masterpiece. Follow these steps for a perfect gluten free baguette every time.
Step 1: Activate the Yeast
In a small bowl, combine the warm water, sugar, and instant yeast. Give it a quick stir and let it sit for about 5-7 minutes until it becomes foamy. This little bubble party tells you your yeast is alive and ready to make your bread rise!
Step 2: Combine the Dough
In the bowl of a stand mixer fitted with a paddle attachment, whisk together the gluten-free flour and salt. Pour in the foamy yeast mixture, egg whites, olive oil, and apple cider vinegar. The vinegar helps mimic the tang of traditional sourdough and adds to the tender crumb.
Step 3: Mix to Perfection
Mix on medium speed for about 3-4 minutes. The dough will be stickier than traditional wheat dough—that’s exactly what we want! It should look like a very thick, scoopable batter.
Step 4: First Rise
Scrape the dough into a lightly oiled bowl, cover it with a clean kitchen towel or plastic wrap, and place it in a warm, draft-free spot. Let it rise for about 45-60 minutes, or until it has roughly doubled in size.
Step 5: Shape the Baguette
Lightly dust a piece of parchment paper with gluten-free flour. Turn the risen dough onto the paper—it will be soft and airy. With wet hands (to prevent sticking), gently shape the dough into a long, slender loaf, about 12-14 inches long.
Step 6: Second Rise & Preheat
Use the parchment paper to lift the loaf onto a baking sheet. Cover it lightly with the towel and let it rise again for another 30-45 minutes. Meanwhile, preheat your oven to 375°F (190°C).
Step 7: Score and Bake
Once risen, use a sharp knife or razor blade to make 3-4 diagonal slashes on top of the loaf. This gives it that professional look and allows steam to escape. Bake for 25-30 minutes, or until the crust is deep golden brown and the loaf sounds hollow when tapped on the bottom.
Step 8: Cool Completely
This is the hardest part! Transfer the baguette to a wire rack and let it cool completely before slicing. This waiting period allows the internal structure to set, giving you that perfect slice.
Helpful Tips & Tricks
Baking gluten-free bread is a science, but don’t let that scare you. Here are my top tips for success.
- Flour is Key: Not all gluten-free flours are created equal. For a reliable texture, stick with a trusted blend meant for bread. The folks at King Arthur Baking have a fantastic guide on gluten-free flours if you’re curious about the science.
- Wet Hands are Happy Hands: When shaping the sticky dough, keep a small bowl of water nearby to wet your hands. It prevents a sticky situation!
- Don’t Skip the Vinegar: That tablespoon of apple cider vinegar is a secret weapon for improving the texture and shelf life of your gluten free bread.
- Patience with Cooling: I know it’s tempting to slice into a warm loaf, but resisting ensures it won’t be gummy inside. It’s worth the wait!
Serving Your Masterpiece
This baguette is incredibly versatile. Slice it thick and serve it alongside a warm bowl of hearty soup. Slice it thin for crostini appetizers. Or, do what my family loves most: slice it lengthwise, toast it, and load it up with toppings for a fantastic gluten-free pizza bread. The possibilities are endless!
Storing Your Gluten Free Baguette
Gluten-free bread is best enjoyed the day it’s made. To keep it fresh, store it in a paper bag at room temperature for up to 2 days. For longer storage, wrap it tightly in plastic wrap and then foil before freezing for up to 3 months. Simply thaw at room temperature or warm it up in the oven to bring back that fresh-baked crispness.

Frequently Asked Questions
Can I make this recipe by hand without a stand mixer?
Absolutely! While a mixer makes it easier, you can definitely mix the dough by hand in a large bowl using a sturdy spatula. It will take a bit more elbow grease to get it fully combined, but the result will be just as delicious.
My dough didn’t rise very much. What went wrong?
This is usually due to one of two things: the yeast was old/inactive, or the water was too hot and killed the yeast. Ensure your yeast is fresh and that your water is warm to the touch, not hot. A good tip is to use a thermometer if you’re unsure; around 110°F is the sweet spot.
Can I use a different type of gluten-free flour?
I strongly recommend using a pre-mixed gluten-free bread flour blend for this recipe. Using a single flour, like almond or coconut flour, will not yield the same results because the blend is specifically formulated with starches and proteins to mimic wheat flour.
How can I get a crispier crust?
For an extra-crispy crust, you can place a small baking dish filled with water on the bottom rack of the oven while it preheats. The steam created during baking helps develop a wonderfully crisp exterior. Just be careful when opening the oven!
There you have it—your new go-to recipe for a gluten free French bread baguette that’s anything but ordinary. It’s a testament to the fact that dietary restrictions don’t have to mean missing out on life’s simple pleasures. From my kitchen to yours, I hope this bread brings as much warmth and happiness to your table as it does to mine. Happy baking
PrintGluten Free French Bread Baguette
Craft perfect gluten-free baguettes with our easy guide. French bread recipe for crispy, delicious results, every time.