Hey there, friend! Ever found yourself dreaming of a juicy, all-American burger but stumbled over that one little detail—the bun? For anyone navigating the world of gluten-free living, that soft, squishy, perfectly-toasted vessel for your favorite patty can feel like the ultimate culinary unicorn. I’ve been there, trust me. Store-bought versions can be dry, crumbly, or just plain sad. But I’m here to tell you that your burger dreams are about to come true.
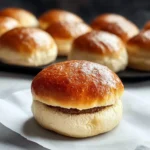
This recipe for homemade gluten free hamburger buns is a total game-changer. They’re soft, slightly sweet, and have that classic domed top perfect for holding all your favorite toppings without falling apart. They’re the answer to your next barbecue, weeknight dinner, or anytime you need a truly satisfying sandwich. Let’s make it happen .
Why You’ll Love These Gluten Free Hamburger Buns
This isn’t just another recipe; it’s your ticket to burger bliss. Here’s why you’re going to adore it:
- No More Compromises: Say goodbye to disappointing, store-bought buns that ruin a good burger. These are soft, fluffy, and everything a bun should be.
- Surprisingly Simple: Don’t be intimidated by yeast dough! I’ve broken it down into super easy, manageable steps.
- Perfect for Families: These buns are a hit with everyone at the table, making them perfect for family dinners where dietary needs are mixed.
- Meal Prep Friendly: Bake a batch and freeze them! You’ll always have a fantastic gluten free bun ready to go.
Gathering Your Ingredients
PrintGluten Free Hamburger Buns
Discover pro baking tech for perfect gluten-free hamburger buns. Achieve bakery-soft texture & flavor with our expert secrets. No more crumbling! (140 chars)
- Prep Time: 15 minutes
- Cook Time: 20 minutes
- Total Time: 2 hours 30 minutes
- Yield: 6 buns 1x
- Category: Bread
- Cuisine: American
Ingredients
Instructions
Notes
A simple recipe for soft, fluffy, and delicious homemade gluten-free hamburger buns. Perfect for your next barbecue or weeknight dinner.
Nutrition
- Serving Size: 6 buns
- Calories: 220 kcal
- Sugar: 3 g
- Fat: 9 g
- Carbohydrates: 30 g
- Fiber: 3 g
- Protein: 6 g
Let’s talk ingredients. The key to great gluten free baking is using a good quality flour blend. I highly recommend using a gluten free all-purpose flour that contains xanthan gum. If yours doesn’t, you’ll need to add it separately.
- 2 cups (280g) gluten free all-purpose flour blend (with xanthan gum)
- 1 tbsp instant yeast
- 1 tbsp sugar
- 1 tsp salt
- 1 cup warm milk (dairy or unsweetened almond milk)
- 2 large eggs, at room temperature
- 3 tbsp unsalted butter, melted
- 1 tbsp olive oil for the bowl
- 1 egg yolk + 1 tbsp water (for egg wash)
- Sesame seeds for topping (optional)
How to Make Your Gluten Free Hamburger Buns
Ready to create some magic? Follow these steps for the best gluten free buns you’ve ever had.
Step 1: Activate the Yeast
In the bowl of a stand mixer, whisk together your gluten free flour, instant yeast, sugar, and salt. Pour in the warm milk and give it a quick stir. Let this mixture sit for about 5-7 minutes. You might see it get a little bubbly—that’s the yeast waking up and saying hello!
Step 2: Create the Dough
Using the paddle attachment on your mixer, beat in the eggs and melted butter on medium speed until a sticky dough forms. This will take about 2 minutes. Gluten-free dough is much stickier than traditional wheat dough, and that’s perfectly normal! Don’t be tempted to add more flour.
Step 3: Let it Rise
Grease a clean bowl with the olive oil and scrape your dough into it. Turn the dough over so it’s lightly coated in oil. Cover the bowl with plastic wrap and place it in a warm, draft-free spot to rise for about 60-90 minutes, or until it has just about doubled in size.
Step 4: Shape the Buns
Once risen, punch the dough down. Turn it out onto a surface lightly dusted with your gluten free flour. Divide the dough into 6 equal pieces. To shape, roll each piece into a smooth ball and then gently flatten it to about 1-inch thick. Place the shaped buns on a parchment-lined baking sheet, spacing them a few inches apart.
Step 5: Second Rise and Bake
Cover the buns loosely with plastic wrap and let them rise again for another 30-45 minutes. Meanwhile, preheat your oven to 375°F (190°C).
Before baking, gently brush the tops of the buns with the egg wash (just mix the yolk with water) and sprinkle with sesame seeds if you like. Bake for 18-22 minutes, or until they are golden brown and sound hollow when tapped on the bottom.
Step 6: Cool Completely
This is the hardest part—waiting! Let the buns cool completely on a wire rack before you slice and serve. This helps them set up and makes them much easier to slice without crumbling.

My Favorite Tools for the Job
Having the right tools makes this process a breeze. You’ll need a stand mixer with a paddle attachment to get the dough just right, a good baking sheet, and a digital kitchen scale for measuring your flour accurately. A scale is a game-changer for gluten-free baking success!
Tips for Bun Perfection & Fun Variations
I’ve made these more times than I can count, and here’s what I’ve learned along the way.
- Warm, Not Hot: Ensure your milk is warm to the touch, not hot. Too much heat will kill the yeast and your buns won’t rise.
- Sticky Situation: Remember, the dough is supposed to be sticky! Wet your hands with a little water or oil when handling it to make shaping easier.
- Go Herby: For a flavor boost, try adding a teaspoon of dried onion powder or garlic powder to the dry ingredients. So good for savory burgers!
- Dairy-Free Delight: This recipe is easily made dairy-free by using a plant-based milk and swapping the butter for a neutral oil like avocado oil.
The Best Way to Serve Them
Obviously, these buns were born to cradle a perfect juicy beef patty, but don’t stop there! They are incredible for pulled pork sandwiches, grilled chicken breasts, or even as a base for a hearty breakfast sandwich. Slice them in half, toast them lightly in a buttered skillet, and get ready for a seriously good meal. I love serving them with a big, fresh avocado salad on the side.
A Quick Look at the Nutrition
Per bun (approximate): Calories: 220 | Fat: 9g | Carbs: 30g | Fiber: 3g | Sugar: 3g | Protein: 6g
Making these gluten free hamburger buns from scratch might seem like a project, but the payoff is absolutely worth it. The pride of pulling a tray of golden, homemade buns from your oven is a feeling like no other. They truly transform an ordinary meal into something special. I hope this recipe brings as much joy to your table as it has to mine. Now, who’s hungry?
Your Gluten Free Hamburger Bun Questions, Answered
Can I make these buns ahead of time?
Absolutely! These buns freeze beautifully. Once they are completely cooled, place them in a freezer-safe bag and freeze for up to 3 months. Just thaw at room temperature or pop them in the toaster straight from the freezer.
My dough didn’t rise very much. What went wrong?
This is usually caused by one of two things: your yeast was old or expired, or your liquid was too hot and killed the yeast. Always check the expiration date on your yeast and make sure your milk is just warm to the touch.
Can I use a different type of gluten free flour?
I highly recommend a good all-purpose blend for the best texture. I don’t recommend using a single flour like almond or coconut flour, as they behave very differently and won’t yield the same results.
How should I store leftover buns?
Because they are homemade and don’t have preservatives, they are best kept in an airtight container or bag at room temperature for 2-3 days. For longer storage, freezing is your best bet.