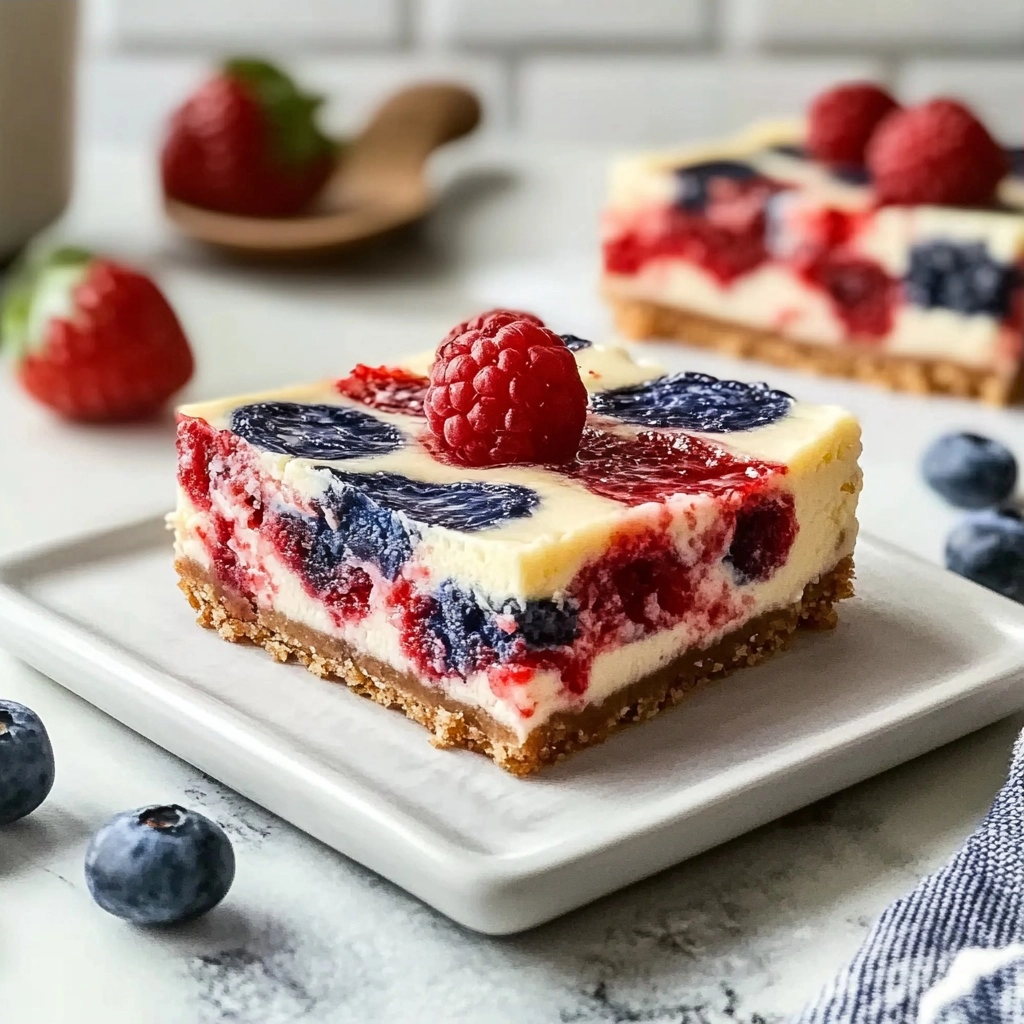
Hey there, fellow food lovers! If you’re anything like me, you’re always on the lookout for a dessert that wows the crowd without demanding hours in the kitchen. Well, look no further! These Gluten-Free Red White and Blue Cheesecake Bars are exactly what you need. They’re not just a treat; they’re a celebration on a plate—perfect for those patriotic holidays, summer BBQs, or any time you want to bring a little extra joy to the table. Plus, they’re naturally gluten-free, so everyone can enjoy them!
Why You’ll Love This Recipe
- Effortlessly Easy: The recipe is straightforward, with clear instructions that even beginner bakers can master.
- Crowd-Pleasing: Everyone loves the classic combination of cheesecake and berries!
- Perfect for Any Occasion: From Memorial Day to Labor Day, these bars are the ideal dessert.
- Gluten-Free Goodness: A fantastic treat that everyone can enjoy without dietary worries.
- Visually Stunning: The red, white, and blue layers make them a showstopper.
Ingredients
PrintSpectacular Gluten-Free Red White and Blue Cheesecake Bars: A Patriotic Treat
A creamy gluten-free cheesecake layered with handmade berry swirls and a grain-free graham cracker crust. These visually stunning bars are perfect for celebrations and easy to prepare.
- Prep Time: 20
- Cook Time: 45
- Total Time: 65
- Yield: 12 bars 1x
- Category: Gluten-Free
- Method: Baking
- Cuisine: American
- Diet: Vegetarian
Ingredients
1 recipe grain-free graham crackers or 2 boxes Simple Mills Pecan Cookies
6 tablespoons unsalted butter or 4 tablespoons coconut oil
1 cup strawberries
1 cup blueberries
2 teaspoons honey (1 teaspoon per berry)
¼ teaspoon all-natural red food coloring (optional)
3 (8-ounce) packages organic cream cheese (room temperature)
⅔ cup maple sugar or organic cane sugar
2 large room temperature eggs
¼ teaspoon Celtic sea salt
¼ cup sour cream
2 tablespoons fresh lemon juice
1 tablespoon vanilla extract
Instructions
Preheat oven to 350°F (175°C). Crush grain-free graham crackers or pecan cookies into fine crumbs
Mix crumbs with melted butter or coconut oil until combined
Press mixture firmly into the bottom of a 9×13 inch baking pan
Mash strawberries and blueberries in separate bowls, add 1 teaspoon honey to each
Blend cream cheese until smooth, gradually add sugar, eggs, salt, sour cream, lemon juice, and vanilla
Spread cheesecake mixture into prepared crust
Spoon mashed berries over cheesecake and gently swirl with a knife
Bake 45 minutes until edges are set but center still jiggles slightly
Cool completely at room temperature before refrigerating for 4 hours or overnight
Cut into 12 bars and serve chilled
Notes
Crush cookies more coarse for a Springform pan alternative
Swap food coloring with strawberry-less remaining color if preferred
Store in airtight container up to 2 days
Nutrition
- Serving Size: 1 bar
- Calories: 250
- Sugar: 18g
- Sodium: 150mg
- Fat: 16g
- Saturated Fat: 9g
- Carbohydrates: 20g
- Fiber: 1g
- Protein: 4g
- Cholesterol: 60mg
Cookie Crust
- 1 recipe grain-free graham crackers or 2 boxes Simple Mills Pecan Cookies
- 6 tablespoons unsalted butter or 4 tablespoons coconut oil
Berry Swirl
- 1 cup strawberries
- 1 cup blueberries
- 2 teaspoons honey divided, 1 teaspoon per berry
- ¼ teaspoon all-natural red food coloring optional
Cheesecake Filling
- 3 (8-ounce) packages organic cream cheese, room temperature
- ⅔ cup maple sugar or organic cane sugar
- 2 large eggs room temperature
- ¼ teaspoon Celtic sea salt
- ¼ cup sour cream
- 2 tablespoons fresh lemon juice
- 1 tablespoon vanilla extract
Step-by-Step Instructions
- Prepare the Crust: Preheat your oven to 350°F (175°C). Crush the grain-free graham crackers or Simple Mills Pecan Cookies in a food processor or by hand until you get fine crumbs. Mix the crumbs with melted butter (or coconut oil) until well combined. Press the mixture firmly into the bottom of a 9×13 inch baking pan.
- Make the Berry Swirl: In separate small bowls, mash the strawberries and blueberries. Add 1 teaspoon of honey to each bowl and stir. If you want a more vibrant red color, add the optional food coloring to the strawberries. Set aside.
- Create the Cheesecake Filling: In a large bowl, beat the cream cheese and sugar until smooth. Add eggs one at a time, mixing well after each addition. Stir in the salt, sour cream, lemon juice, and vanilla extract until blended.
- Assemble the Bars: Pour the cheesecake filling over the crust. Drop spoonfuls of the strawberry mixture and blueberry mixture on top of the cheesecake filling. Use a toothpick or knife to gently swirl the berry mixtures to create a marbled effect.
- Bake: Bake in the preheated oven for 30-35 minutes, or until the edges are set and the center still has a slight jiggle.
- Cool and Chill: Let the cheesecake bars cool completely in the pan at room temperature. Then, refrigerate for at least 4 hours, or preferably overnight, before cutting and serving. Trust me, the waiting is worth it!
Equipment
- 9×13 inch baking pan
- Food processor (optional, for making crumbs)
- Mixing bowls
- Electric mixer (or whisk)
- Measuring cups and spoons
- Toothpick or knife (for swirling)
Tips & Variations
- Crust Swap: Feel free to use your favorite gluten-free cookie crumbs for the crust.
- Berry Alternatives: Not a fan of strawberries or blueberries? Raspberries and blackberries work wonderfully too.
- Make It Ahead: These bars are perfect for making ahead! Just store them in the fridge covered for up to 3 days. Also, check out some other great make-ahead meal ideas to save even more time.
- Storage: Store leftover bars in an airtight container in the refrigerator for up to 4 days.
Serving Suggestions
These cheesecake bars are delicious on their own, but they also pair beautifully with a dollop of whipped cream or a fresh berry garnish. Consider serving them at your next backyard BBQ or potluck. Or, if they’re just for you, maybe pair them with a refreshing smoothie for a delightful treat. The presentation is half the fun, so get creative! I like to slice them into squares for easy serving.
Nutrition Facts
(This will vary based on exact ingredients and portions, but here is a simple estimate.)
Per Serving (estimated):
- Calories: 350-400
- Carbs: 30-35g
- Protein: 5-7g
- Fat: 25-30g
*Note: These are estimates*
Conclusion
There you have it—a stunning, easy-to-make dessert that’s perfect for any occasion! These Gluten-Free Red White and Blue Cheesecake Bars are more than just a recipe; they are a way to celebrate, connect, and bring a little sweetness into your life. So, gather your ingredients, put on your apron, and get ready to create some magic in the kitchen. Don’t forget to share your creations and tell me how they turned out! If you loved this recipe, explore my other easy recipes and discover more delicious dishes to brighten your day. Happy baking!
FAQ Section
Can I freeze this recipe?
Absolutely! These cheesecake bars freeze beautifully. Wrap them tightly in plastic wrap and then foil. They can last in the freezer for up to 2 months. Thaw them in the refrigerator overnight before serving.
How to make it ahead?
You can make the cheesecake bars up to 2 days ahead of time. Simply prepare the recipe, bake, and chill. Store them in the refrigerator covered, and they’ll be ready to serve when you are. Plan ahead and explore other easy recipes to help streamline your meal prep.
Can I use a different cheese?
While cream cheese is the star, you could try a blend of cream cheese and a bit of mascarpone for extra richness. However, for the best results, stick with the specified cream cheese.
How can I make the crust from scratch?
If you prefer a homemade crust, crumble gluten-free graham crackers and add melted butter or coconut oil. Mix until it resembles wet sand; press into the pan; pre-bake for 5-7 minutes.