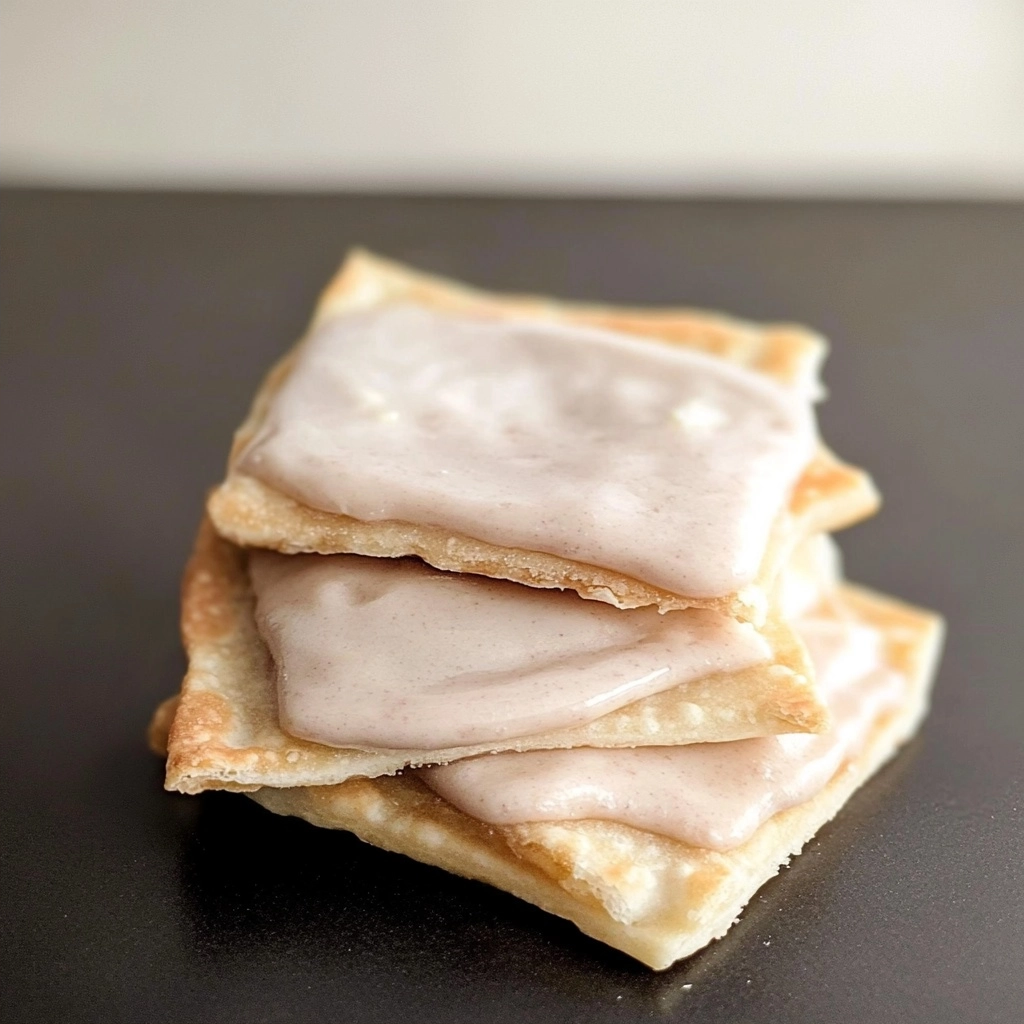
Gluten Free Pop Tarts offer a comforting and familiar breakfast treat made without wheat or gluten. This recipe delivers flaky, golden pastries filled with sweet cinnamon-sugar and topped with a simple glaze. Enjoy a healthier, homemade version of a classic snack, perfect for any time of day.
This recipe provides all the joy of the original toaster pastry with a carefully crafted gluten-free approach. The result is a satisfying treat that rivals any store-bought alternative, making mornings brighter and snack times more delightful. Everyone can enjoy these homemade delights.
Recipe Overview
| Prep Time | 30 minutes |
|---|---|
| Cook Time | 8-10 minutes |
| Total Time | 38-40 minutes (plus cooling time) |
| Servings | Approximately 12 pastries (24 rectangles) |
| Difficulty | Medium |
| Cuisine | American |
Why This Recipe Works
Crafting scratch-made Gluten Free Pop Tarts was a mission to recapture a beloved childhood treat. The initial attempts focused heavily on achieving that signature flaky texture, something often elusive in gluten-free baking. I experimented with various flour blends and binders to ensure the dough behaved predictably. The key was finding the right balance of gluten-free flour, a binder like xanthan gum, and cold butter. This combination creates layers that puff up beautifully during baking, mimicking the desired crispness.
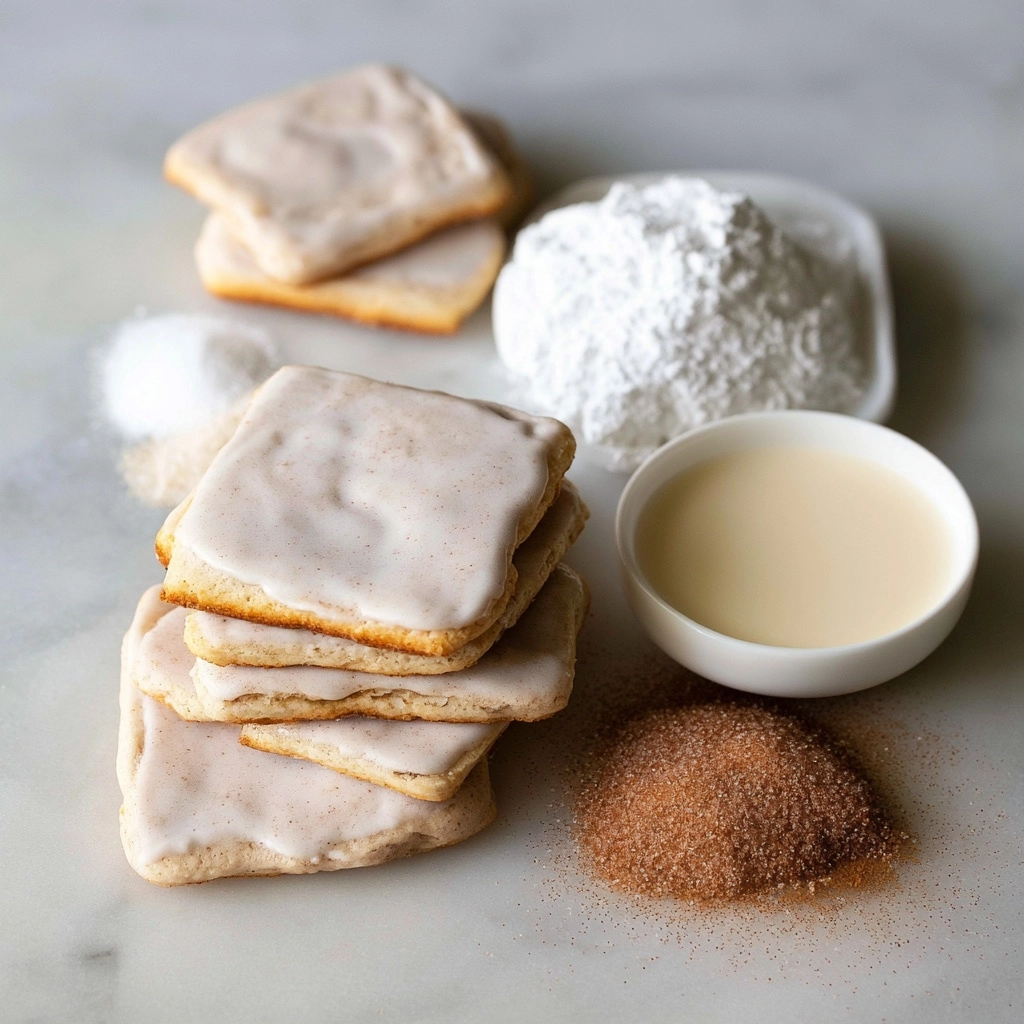
The filling and glaze are straightforward, allowing the pastry to truly shine. A simple brown sugar and cinnamon filling provides that classic sweet warmth without being overly complicated. Similarly, the glaze is a basic confectioners’ sugar and water mixture, enhanced with a touch of cinnamon, creating a sweet finish that sets nicely. These components work harmoniously, ensuring each bite is a delightful balance of textures and comforting flavors that are satisfyingly reminiscent of the original.
Ingredients
PrintGluten Free Pop Tarts
A flaky, golden, homemade gluten-free pop tart recipe with cinnamon-sugar filling and a sweet glaze. Healthy alternative to traditional toaster pastries, perfect for breakfast or snacks. No pork, lard, or alcohol.
- Prep Time: 35
- Cook Time: 10
- Total Time: 45
- Yield: 12 pastries 1x
- Category: Gluten-Free
- Method: Baking
- Cuisine: American
- Diet: Gluten free
Ingredients
2 ¼ cups (315 g) all-purpose gluten free flour blend
1 teaspoon xanthan gum
¼ cup (36 g) cornstarch
¼ teaspoon kosher salt
½ cup (115 g) unsalted cold butter, cubed
¾ cup (150 g) brown sugar (for filling)
2 tablespoons ground cinnamon
1 cup (120 g) confectioners’ sugar (for glaze)
2 tablespoons water
Instructions
Preheat oven to 400°F (200°C)
In food processor, combine gluten-free flour blend, xanthan gum, cornstarch, and salt
Cut in cold butter until mixture resembles coarse sand
Add 3-4 tablespoons ice water, mixing until dough forms a ball
Wrap dough in plastic, chill 30 minutes
On floured surface, roll dough into ¼ inch thickness
Cut into 4.5 inch squares, cut each corner diagonally to create 12-inch diagonals
Fill half with brown sugar-cinnamon mixture
Fold unfilled half onto filling, press edges to seal
Cut cooled pastries into individual pop tarts
Bake until golden, 8-10 minutes
Mix confectioners’ sugar, water, and cinnamon for glaze
Dip tops in glaze and let set
Notes
Use parchment paper for easier handling
If dough becomes sticky, chill again
For best texture, work quickly with cold butter
Nutrition
- Serving Size: 1 pop tart
- Calories: 190
- Sugar: 14g
- Sodium: 100mg
- Fat: 9g
- Saturated Fat: 6g
- Carbohydrates: 25g
- Fiber: 1g
- Protein: 3g
- Cholesterol: 20mg
| Ingredient | Quantity | Notes with alternatives |
|---|---|---|
| All purpose gluten free flour blend | 2 ¼ cups (315 g) | Use a blend with xanthan gum or add separately. Better Batter recommended. |
| Xanthan gum | 1 teaspoon | Omit if your flour blend already contains it. Crucial for binding. |
| Cornstarch | ¼ cup (36 g) | Adds tenderness and a lighter crumb. |
| Kosher salt | ¼ teaspoon | Enhances overall flavor. |
| Granulated sugar | ¾ cup (150 g) | Provides sweetness and aids in browning. |
| Unsalted butter, melted and cooled | 8 tablespoons (112 g) | Use dairy-free butter for a vegan option. |
| Pure vanilla extract | 1 teaspoon | Adds depth of flavor. |
| Egg, at room temperature, beaten | 1 (50 g) | Flax egg (1 tbsp flaxseed meal + 3 tbsp water, rested) for vegan variation. |
| Milk, at room temperature | ¼ cup (2 fl oz) | Almond, soy, or oat milk also work. |
| Packed light brown sugar | ½ cup (109 g) | For the filling. |
| Cornstarch | 1 tablespoon (9 g) | For thickening the filling. |
| Ground cinnamon | ½ teaspoon | For the filling. For the glaze: |
| Confectioners’ sugar | 1 cup (115 g) | Sifted for a smoother glaze. |
| Ground cinnamon | ¼ teaspoon | For the glaze. |
| Lukewarm water | 2 teaspoons | Adjust for desired glaze consistency. |
Step-by-Step Instructions
Prepare the Crust
-
Preheat your oven to 350°F (175°C). Line a large rimmed baking sheet with unbleached parchment paper and set it aside.
-
In a large bowl, combine the gluten-free flour blend, 1 teaspoon xanthan gum (if using), ¼ cup cornstarch, ¼ teaspoon salt, and ¾ cup granulated sugar. Whisk ingredients thoroughly to ensure even distribution.
-
Create a well in the center of the dry ingredients. Add the melted and cooled butter, 1 teaspoon vanilla extract, 1 beaten egg, and ¼ cup milk to the well.
-
Mix all ingredients together until a thick dough forms. This initial mixture will be stiff.
-
Knead the dough directly in the bowl with your hands until it becomes smooth and cohesive. If the dough is too dry, add more milk, ½ teaspoon at a time, until it comes together without being sticky.
-
Divide the dough into two equal portions. Cover one portion with plastic wrap or a clean kitchen towel to prevent it from drying out while you work with the other.
-
On a lightly floured surface (using gluten-free flour), place the first piece of dough. Sprinkle lightly with additional flour to prevent sticking.
-
Roll out the dough to approximately ¼-inch thickness. Move the dough frequently, dusting with more flour as needed to maintain a non-stick surface.
-
Cut the dough into rectangles, aiming for approximately 3-inches by 4-inches. Gently re-roll each rectangle slightly to achieve a thickness just under ¼-inch.
-
Gather and reroll the dough scraps. Repeat the rolling and cutting process with the second half of the dough. Ensure you have an even number of rectangles, ideally at least 24 in total, for pairing.
Prepare Filling and Assemble Pastries
-
In a small bowl, combine ½ cup packed light brown sugar, 1 tablespoon cornstarch, and ½ teaspoon ground cinnamon. Mix these filling ingredients well until fully incorporated.
-
Take half of your dough rectangles. Spoon approximately 1 tablespoon of the filling onto the center of each rectangle. Spread the filling evenly, leaving a ½-inch border around the edges clear of filling.
-
Place a second dough rectangle on top of each filled rectangle, creating a sealed pastry. Gently press around the edges to seal the filling inside. Trim any uneven or jagged edges for a neater appearance.
-
Arrange the assembled pastries about 2 inches apart on the prepared baking sheet.
-
Dock the tops of each pastry by piercing them all over with a toothpick or the tines of a fork. This allows steam to escape during baking.
Bake the Pastries
-
Place the baking sheet with the pastries into the center of the preheated oven.
-
Bake for 8 to 10 minutes, or until the edges appear very lightly golden brown and the center is set. The exact time may vary slightly based on your oven.
-
Remove the baking sheet from the oven. Allow the pastries to cool completely on the baking sheet before proceeding to the glazing stage. This prevents the glaze from melting off.
Make and Apply the Glaze
-
In a small bowl, combine 1 cup sifted confectioners’ sugar and ¼ teaspoon ground cinnamon. Mix these glaze ingredients thoroughly.
-
Add 2 teaspoons of lukewarm water to the sugar mixture and stir until a thick paste forms.
-
Gradually add more lukewarm water, ½ teaspoon at a time, until the glaze reaches a thickly pourable consistency. It should be thick enough to coat but still spreadable.
-
Once the pastries are completely cool, generously spread or drizzle the glaze over the top of each one.
-
Allow the glaze to set completely at room temperature before serving or storing. This may take 30-60 minutes.
Chef Tips for Perfect Results
-
Ensure your gluten-free flour blend is suitable for pastries; blends with rice flour and starches generally perform well.
-
Chill the dough briefly if it becomes too soft and sticky while rolling. This makes it easier to handle and prevents sticking.
-
Do not overfill the pastries. Too much filling can cause leaks during baking, making a mess.
-
Docking the pastries is essential. It prevents the tops from puffing up too much and potential bursting.
-
Cool pastries completely before glazing. Warm pastries will melt the glaze, resulting in a sticky, uneven coating.
-
Adjust the glaze consistency carefully. Too thin will run off; too thick will be difficult to spread.
Common Mistakes to Avoid
-
Using a flour blend without a binder: Gluten-free flours lack structure. Without xanthan gum or a similar binder, your pastries will likely crumble and fall apart. Fix: Always include xanthan gum or ensure your blend has it.
-
Overworking the dough: While it’s gluten-free, excessive handling can still make the dough tough or gummy. Fix: Mix and knead only until the dough just comes together smoothly.
-
Rolling the dough too thin: If the dough is too thin, it can tear easily during assembly or become overly crisp and brittle after baking. Fix: Aim for a consistent ¼-inch thickness, rerolling gently if needed.
-
Sealing the edges improperly: Inadequate sealing allows the filling to escape during baking, leading to a less appealing and potentially messy pastry. Fix: Press firmly around the entire edge with a fork or your fingers to ensure a tight seal.
-
Glazing warm pastries: Applying glaze to warm pastries causes it to melt and slide off, creating a patchy and sticky finish. Fix: Wait for the pastries to cool down to room temperature before glazing.
Variations and Substitutions
| Ingredient | Substitution | Impact on Flavor |
|---|---|---|
| All purpose gluten free flour blend | Nut-based gluten-free flour (e.g., almond flour blend) | May result in a denser, richer, slightly nuttier pastry. Texture may differ. |
| Unsalted butter | Vegan butter or coconut oil (solid, chilled) | Vegan butter yields similar results. Coconut oil may impart a slight coconut flavor and affect flakiness. |
| Egg | Flax egg (1 tbsp flaxseed meal + 3 tbsp water, rested) | Slightly chewier texture, may affect binding slightly. Flavor remains neutral. |
| Milk | Non-dairy milk (almond, soy, oat) | Minimal impact on flavor and texture if unsweetened. |
| Brown sugar filling | Fruit jam or preserves (approx. 1 tbsp per pastry) | Replaces cinnamon sugar with fruity flavors. Ensure jam is thick. |
| Confectioners’ sugar glaze | Lemon juice mixed with confectioners’ sugar | Adds a tangy citrus note to the sweet topping. |
Serving Suggestions and Pairings
These Gluten Free Pop Tarts are perfect for a quick breakfast alongside a glass of cold milk or a hot cup of coffee. For a more substantial brunch, serve them as a sweet counterpoint to savory dishes like scrambled eggs or breakfast sausages. They also make an excellent afternoon snack or a portable treat for picnics and road trips. Consider pairing them with fresh fruit like berries for added freshness. For holidays or special occasions, a dusting of colorful gluten-free sprinkles on the glaze adds a festive touch.
Storage and Reheating
| Method | Duration | Instructions |
|---|---|---|
| Room Temperature (un-glazed) | 1-2 days | Store in an airtight container. Best eaten fresh. |
| Room Temperature (glazed) | 1 day | Store in an airtight container. Glaze may soften slightly over time. |
| Refrigerator | 3-4 days | Store in an airtight container. Can be eaten cold or reheated. |
| Freezer (baked, un-glazed) | 1-2 months | Wrap individual pastries tightly in plastic wrap, then in foil. Thaw at room temperature before glazing or reheating. |
| Reheating | N/A | Warm gently in a toaster oven or conventional oven at 300°F (150°C) for 3-5 minutes until warmed through. Avoid microwave, which can make pastries chewy. |
Nutritional Information
| Nutrient | Amount per Serving |
|---|---|
| Calories | Approximate values (will vary based on specific ingredients used) |
| Protein | Approximate values |
| Fat | Approximate values |
| Carbohydrates | Approximate values |
| Fiber | Approximate values |
| Sugar | Approximate values |
| Sodium | Approximate values |
Frequently Asked Questions
Can I substitute the flour?
Yes, various gluten-free flour blends can be used. Opt for blends designed for baking that contain a mix of rice flours, starches, and a binder like xanthan gum. Ensure your chosen blend is suitable for pastry to achieve the best texture. Different blends may alter the final consistency slightly.
How do I know if they are done?
The Gluten Free Pop Tarts are done when the edges are a very light golden brown and the pastry itself appears set, not soft or wet in the center. They should feel slightly firm to the touch. Overbaking can make them too crisp or dry. Monitor them closely during the last few minutes of baking.
My pastries are leaking filling, what went wrong?
Leaking usually occurs if the edges were not sealed properly or if the pastry was overfilled. Ensure you press firmly around all of the edges to create a strong seal. Also, spread the filling evenly, leaving adequate border space. Docking the tops helps prevent excessive internal pressure.
Can I make these ahead of time?
Yes, baked and un-glazed pastries can be frozen for up to two months. Glazed pastries can be stored at room temperature for one day or refrigerated for up to four days. For best results, prepare the glaze fresh just before serving if making them significantly ahead.
What is the best way to serve them?
Serve these Gluten Free Pop Tarts slightly warm or at room temperature. They are delicious on their own with a glass of milk or a hot beverage. Consider pairing them with fresh fruit for a balanced breakfast. For a fun treat, serve them alongside ice cream for dessert.
Enjoying homemade Gluten Free Pop Tarts offers a wonderful way to indulge in a classic treat with a mindful approach to ingredients. This recipe ensures a delightful flaky crust and a comforting sweet filling, all without gluten. Perfect for busy mornings or as a special snack, these homemade pastries bring joy to any occasion. Bake a batch and savor the simple pleasure of a perfectly executed, familiar flavor.