The rich, buttery aroma of freshly baked brioche bread can transform any kitchen into a French patisserie. For many, this luxurious loaf seems like a professional baking feat, but we are here to show you it is wonderfully achievable at home. This guide will unveil the secrets to creating a perfect, golden-brown brioche with a tender, feather-light crumb. We will walk you through the simple ingredients, the surprisingly easy process, and share our pro-tips for making this delicious homemade brioche bread recipe your new weekend triumph.
Gathering Your Brioche Bread Ingredients
Creating an exceptional brioche starts with gathering high-quality components. This easy homemade brioche bread recipe relies on a handful of simple ingredients, but their quality makes a significant difference in the final product.
PrintEasy Brioche Bread Recipe Homemade Bakery Secrets

Master this easy homemade brioche recipe Learn essential bakery secrets for a soft buttery golden loaf Perfect for beginners
- Prep Time: 30 minutes
- Refrigeration Time: 6 hours
- Cook Time: 40 minutes
- Total Time: 9 hours 30 minutes
- Yield: 1 loaf
- Category: Bread
- Cuisine: French
Ingredients
Instructions
Nutrition
- Calories: 250 kcal
- Sugar: 5 g
- Fat: 12 g
- Carbohydrates: 28 g
- Fiber: 1 g
- Protein: 6 g
The Foundation of Flavor
At its heart, brioche is an enriched dough, meaning it is packed with butter, eggs, and a touch of sugar. You will need all-purpose flour for structure, active dry yeast for the rise, whole milk for tenderness, granulated sugar for a hint of sweetness and to feed the yeast, salt for flavor balance, and large eggs which provide richness and color. The star, however, is unsalted butter. Use the best quality butter you can find, as its flavor will shine through. For an even richer crumb, consider using high-protein bread flour. Whether you are making classic loaves or delightful brioche dinner rolls, these ingredients form the essential base.
Why Quality Matters in Brioche
Because the ingredient list is short, each one plays a critical role. Fresh, high-protein flour develops the strong gluten network needed to support all the rich butter and eggs. Using fresh yeast, not expired, ensures a good, steady rise. Most importantly, high-fat, European-style butter (around 82-84% butterfat) will give your brioche its signature melt-in-your-mouth texture and superior flavor compared to standard butter. This attention to detail transforms a simple baking project into an extraordinary homemade bread experience.
The Simple Process of Making Brioche Dough
While the ingredient list is straightforward, the method is where the magic happens. Do not be intimidated; making brioche dough is a forgiving process, especially with a stand mixer doing most of the work.
Mixing and Kneading to Perfection
Begin by warming the milk slightly and dissolving the yeast and a pinch of sugar in it. This “proofing” step activates the yeast. In the bowl of your stand mixer fitted with a dough hook, combine the flour, remaining sugar, and salt. Add the yeast mixture and eggs, then mix on low speed until a shaggy dough forms. Now, with the mixer running, add the softened butter one tablespoon at a time, waiting for each piece to be fully incorporated before adding the next. This slow incorporation is key to a smooth, homogeneous dough. Once all the butter is in, increase the speed and knead for about 8-10 minutes until the dough is very smooth, elastic, and slightly sticky.
The All-Important First Rise
After kneading, the dough will be soft and glossy. Place it in a lightly greased bowl, turn it over to coat, and cover it with plastic wrap. Here is the first test of patience: the first rise. Unlike many breads, brioche benefits from a slow, cold fermentation. Instead of a warm rise, place the bowl in the refrigerator for at least 6 hours, or preferably overnight. This slow chill allows the flavors to develop beautifully and firms up the butter, making the dough much easier to handle and shape later. This is the secret weapon for the best easy homemade brioche bread recipe.

Shaping and Baking Your Masterpiece
After its long rest, your dough is ready to transform into a beautiful loaf. This is where you can get creative, shaping a classic loaf, individual rolls, or even a stunning braided brioche.
From Dough to Loaf
Turn the cold dough out onto a lightly floured surface. It will be firm and easy to work with. Gently punch it down to deflate it. For a standard loaf, divide the dough into equal portions, shape them into smooth balls, and place them snugly into a greased loaf pan. For a traditional look, you can create a beautiful braid or simply form a large boule. Cover the shaped dough with a clean kitchen towel and let it rise in a warm, draft-free place until it has nearly doubled in size and looks puffy. This second rise usually takes 1.5 to 2 hours because the dough is still cold.
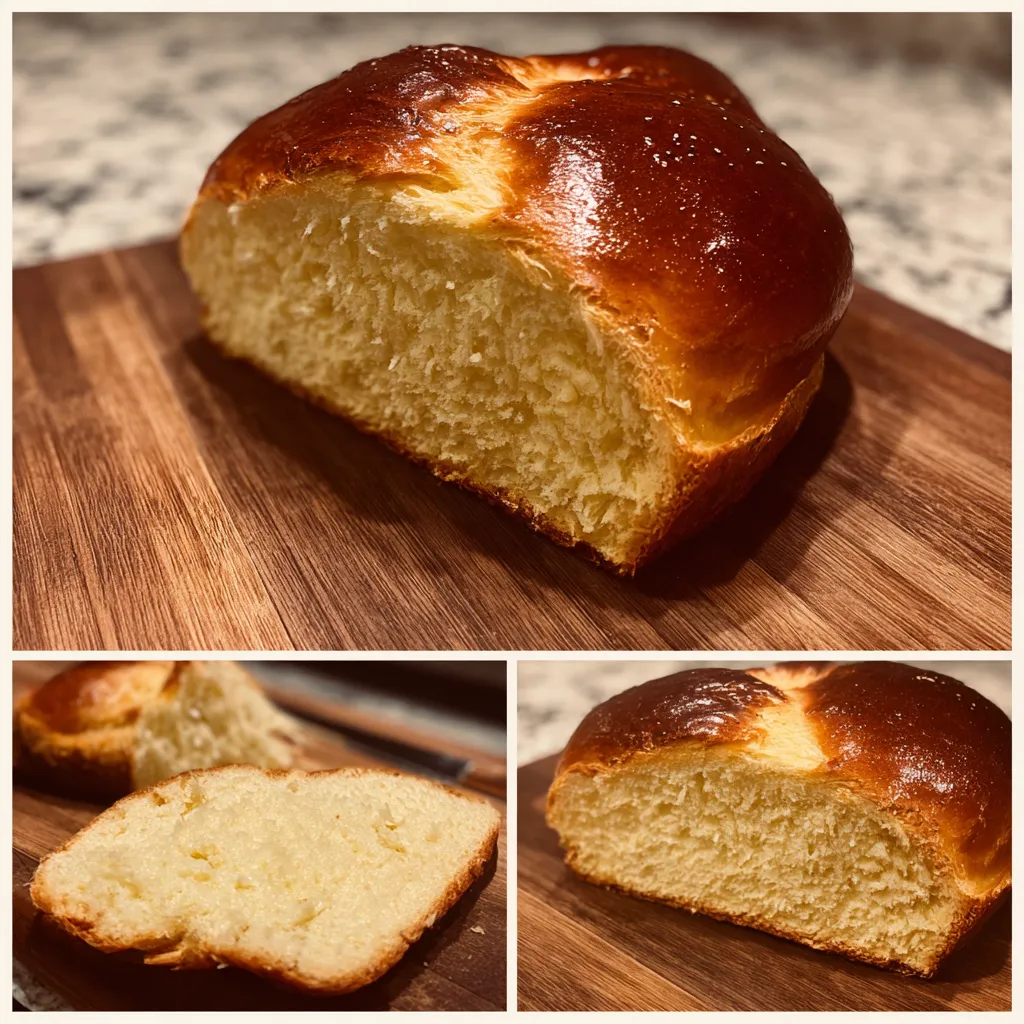
Achieving the Perfect Golden Bake
Before baking, brush the top of the loaf with an egg wash—a simple mixture of one egg beaten with a tablespoon of water or milk. This gives the baked brioche its characteristic deep, glossy, golden-brown crust. Bake in a preheated 350°F (175°C) oven for 30-40 minutes, or until the internal temperature reads 190°F (88°C) and the top is a deep golden brown. If the top browns too quickly, tent it loosely with aluminum foil. The smell will be incredible. Let the loaf cool in the pan for about 10 minutes before turning it out onto a wire rack to cool completely. This waiting period is crucial for the structure to set.
Serving and Storing Your Homemade Brioche
Your beautiful, golden loaf is ready to enjoy. The versatility of brioche is one of its greatest assets, making it perfect for everything from a simple breakfast to an elegant dessert.
How to Enjoy Your Fresh Brioche
The options are endless. Slice it thick and toast it lightly for the best toast you have ever had—it makes exceptional French toast or bread pudding. Enjoy a slice simply slathered with high-quality jam or your favorite homemade jam. It is fantastic for gourmet sandwiches, especially with chicken salad or roasted turkey. For a truly decadent treat, use slightly stale brioche to make a show-stopping dessert. Its rich, buttery flavor and soft texture are simply unmatched by any store-bought bread.
Keeping Your Brioche Fresh
Due to its high butter and egg content, brioche stays moist longer than a classic French baguette. To maintain its freshness, store the completely cooled loaf in a plastic bag or an airtight container at room temperature for up to three days. For longer storage, brioche freezes beautifully. Wrap the whole loaf or individual slices tightly in plastic wrap and then in foil. Freeze for up to three months. Simply thaw at room temperature or pop a frozen slice straight into the toaster for a quick and delicious treat anytime.
Frequently Asked Questions
Can I make brioche without a stand mixer?
Absolutely. While a stand mixer makes the process easier, you can make brioche by hand. It will require about 15-20 minutes of vigorous kneading on a floured surface to achieve the necessary smooth, elastic texture. Be prepared for a bit of an arm workout!
Why is my brioche dough so sticky?
Brioche dough is inherently sticky due to the high fat content. Resist the urge to add too much extra flour during kneading, as this can make the bread dense. Instead, lightly oil your hands and work surface to handle the dough more easily. It will become less sticky as the gluten develops.
My dough didn’t rise much in the fridge. Is that normal?
Yes, this is completely normal. The cold temperature of the refrigerator significantly slows down the yeast activity. The primary goal of the cold ferment is flavor development, not a large volume increase. The dough will do most of its rising during the second, warmer proofing stage after shaping.
Can I use instant yeast instead of active dry yeast?
Yes, you can substitute instant yeast. You can typically add it directly to the dry ingredients without proofing it in liquid first. Use the same amount by weight, or about 25% less by volume if measuring with teaspoons.