Who says you need an oven to create a dessert that tastes like a hug in a pan? If you’re looking for a sweet treat that’s equal parts nostalgic and no-fuss, you’ve come to the right place. These Banana Pudding Bars are my absolute go-to when I need a guaranteed crowd-pleaser without breaking a sweat. They combine the classic, comforting flavors of banana pudding with the fun, handheld convenience of a bar. It’s the perfect solution for potlucks, busy weeknights, or when that stubborn sweet tooth just won’t quit.
Table of Contents
Table of Contents
Why You’ll Love These Banana Pudding Bars
Seriously, what’s not to love? This recipe is a lifesaver for so many reasons.
- No Baking Required: Yes, you read that right! Your oven gets to take a nap. This is a chill-and-serve situation, perfect for hot summer days.
- Incredibly Easy: If you can layer ingredients, you can absolutely master this dessert. It’s practically foolproof.
- Family-Friendly Magic: The combination of creamy pudding, sweet bananas, and crunchy Nilla wafers is a trio that wins over kids and adults alike.
- Make-Ahead Marvel: These bars need time to set in the fridge, making them the ultimate do-ahead dessert for parties.
Gather Your Ingredients
Here’s what you’ll need to create this slice of heaven. The beauty is in its simplicity
Print
Banana Pudding Bars Recipe
- Total Time: 4 hours 30 minutes
- Yield: 12 bars 1x
Description
Easy banana pudding bars recipe. Learn to make delicious no-bake dessert with simple tech. Perfect for potlucks & parties. Get the quick method now!
Ingredients
- 1 (11 ounce) box of Nilla Wafers
- 4–5 medium ripe (but firm) bananas
- 1 (8 ounce) block of cream cheese, softened
- 1/2 cup (1 stick) unsalted butter, softened
- 2 cups powdered sugar
- 2 (3.4 ounce) boxes of instant banana pudding mix
- 3 1/2 cups cold whole milk
- 1 (8 ounce) tub of frozen whipped topping (like Cool Whip), thawed
Instructions
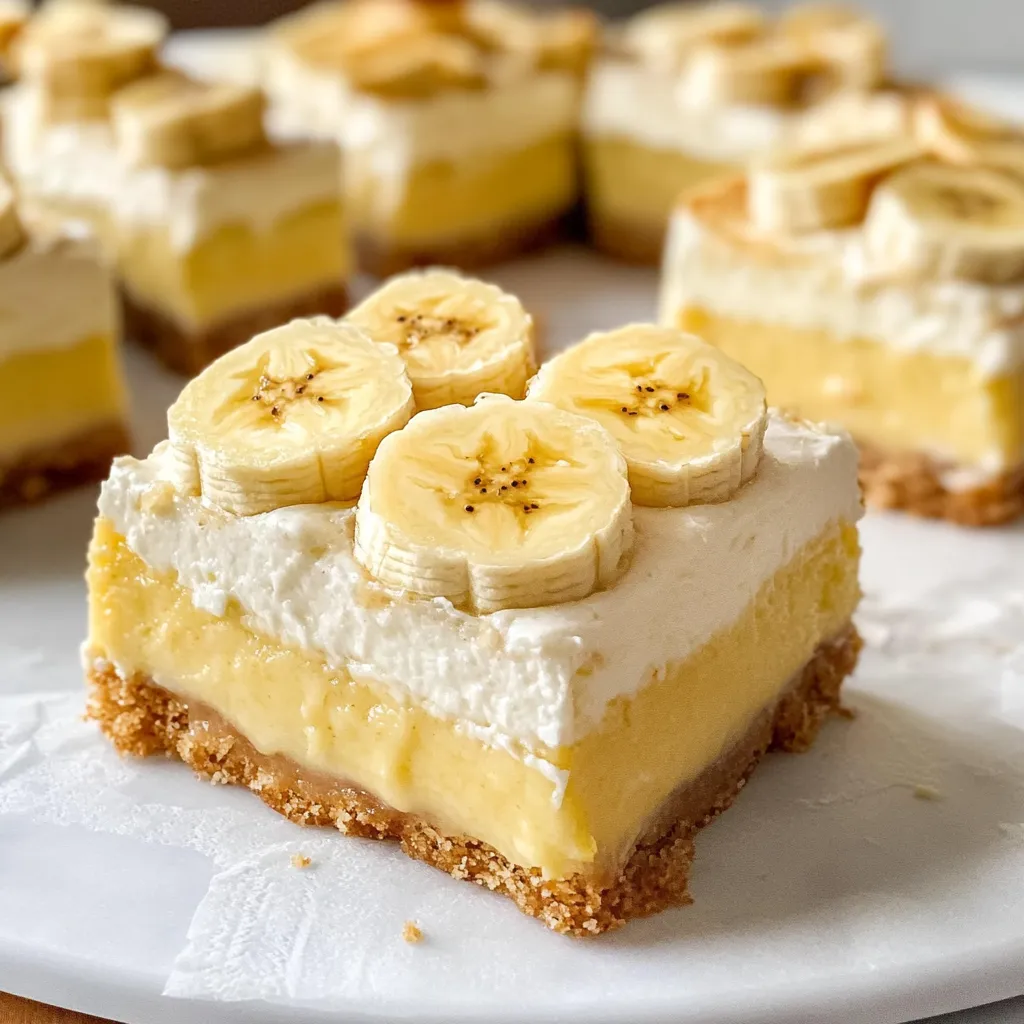
- Create the Crust: Line a 9×13 inch baking dish with parchment paper. Arrange a single, snug layer of Nilla Wafers to cover the entire bottom of the dish.
- Slice the Bananas: Peel and slice your bananas into rounds about 1/4-inch thick. Layer them evenly over the Nilla Wafers.
- Whip the Creamy Layer: In a large bowl, use an electric mixer to beat the softened cream cheese and butter together until smooth and creamy. Gradually beat in the powdered sugar until well combined.
- Make the Pudding: In a separate bowl, whisk the instant banana pudding mixes with the cold milk for about 2 minutes. Let it sit for a few minutes to thicken slightly.
- Combine and Spread: Gently fold the thickened pudding and the entire tub of whipped topping into the cream cheese mixture. Spread this mixture evenly over the banana layer in your dish.
- Top and Chill: Crush the remaining Nilla Wafers and sprinkle them over the top. Cover the dish and refrigerate for at least 4 hours, but ideally overnight.
Notes
Creamy no-bake banana pudding bars layered with Nilla wafers and fresh bananas. An easy, crowd-pleasing dessert perfect for any occasion.
- Prep Time: 30 minutes
- Category: Dessert
- Cuisine: American
Nutrition
- Serving Size: 12 bars
- Calories: 420 calories
- Sugar: 38 grams
- Fat: 22 grams
- Carbohydrates: 52 grams
- Fiber: 2 grams
- Protein: 6 grams
- 1 (11 oz) box of Nilla Wafers
- 4-5 medium ripe (but firm) bananas
- 1 (8 oz) block of cream cheese, softened
- 1/2 cup (1 stick) unsalted butter, softened
- 2 cups powdered sugar
- 2 (3.4 oz) boxes of instant banana pudding mix
- 3 ½ cups cold whole milk
- 1 (8 oz) tub of frozen whipped topping (like Cool Whip), thawed
How to Make Banana Pudding Bars
Just a few simple steps stand between you and dessert bliss. Let’s get layering!
- Create the Crust: Line a 9×13 inch baking dish with parchment paper. Arrange a single, snug layer of Nilla Wafers to cover the entire bottom of the dish. This will be your delicious foundation.
- Slice the Bananas: Peel and slice your bananas into rounds about 1/4-inch thick. Layer them evenly over the Nilla Wafers. A little overlap is just fine!
- Whip the Creamy Layer: In a large bowl, use an electric mixer to beat the softened cream cheese and butter together until the mixture is smooth and creamy. Gradually beat in the powdered sugar until everything is well combined.
- Make the Pudding: In a separate bowl, whisk the instant banana pudding mixes with the cold milk for about 2 minutes. Let it sit for a few minutes to thicken slightly.
- Combine and Spread: Gently fold the thickened pudding and the entire tub of whipped topping into the cream cheese mixture. This is your dreamy, creamy filling! Spread this mixture evenly over the banana layer in your dish.
- Top and Chill: Crush the remaining Nilla Wafers and sprinkle them over the top for a delightful crunch. Cover the dish and refrigerate for at least 4 hours, but ideally overnight. This patience-testing step is crucial for the perfect sliceable texture.
My Best Tips for Perfect Bars
I’ve made this more times than I can count, and here are my little secrets for success:
- Banana Ripeness is Key: Use bananas that are yellow with maybe a few speckles, but not mushy. Overripe bananas will make the bars too soggy.
- Avoid Pudding Lumps: Make sure your cream cheese and butter are truly softened to room temperature. This prevents little lumps in your creamy layer.
- Chill Time is Non-Negotiable: I know it’s hard to wait, but giving these bars a full 4+ hours to set is what transforms them from a pudding mess into neat, beautiful bars.
- Get Creative: Stir a handful of mini chocolate chips into the creamy layer, or add a drizzle of caramel sauce before serving for a bananas Foster twist!
How to Serve and Store
When you’re ready to serve, use the parchment paper to lift the whole slab of dessert out of the pan onto a cutting board. This makes slicing into clean bars super easy. They’re delicious all on their own, but a little extra dollop of whipped topping never hurt anybody!
Store any leftovers (a rare occurrence in my house) covered in the refrigerator for up to 3 days.
Can I make these Banana Pudding Bars ahead of time?
Absolutely! In fact, I highly recommend it. Making them the day before you need them gives them plenty of time to set perfectly and makes your party day so much less stressful.
Can I use homemade whipped cream instead of Cool Whip?
You can, but be aware that stabilized whipped cream holds up better. The whipped topping in this recipe helps the bars maintain their structure for longer. If you use fresh whipped cream, the bars will be a bit softer and are best eaten within a day.
How do I prevent the bananas from turning brown?
The creamy layers do a pretty good job of protecting the bananas from air, so they shouldn’t brown too much. However, if you’re concerned, you can toss the banana slices in a tiny bit of lemon or pineapple juice before layering. This will slow down the oxidation process without affecting the flavor too much.
Can I use a different pudding flavor?
Of course! Vanilla pudding is a classic and delicious alternative. You could also try cheesecake or white chocolate pudding for a fun variation. The method stays exactly the same.
There you have it! These No-Bake Banana Pudding Bars are more than just a dessert; they’re a little piece of comforting, shareable joy. They remind me of the simple pleasures of family gatherings and the magic that happens when a few basic ingredients come together. I hope this recipe finds its way into your regular rotation and brings as many smiles to your table as it has to mine. If you’re looking for another no-bake hit, you have to try my No-Bake Lemon Cheesecake. Happy baking—or rather, happy chilling!
Banana pudding bars are the ultimate no-bake dessert! Creamy, dreamy, and layered with flavor, this easy recipe is a guaranteed hit for any occasion.