Let’s be real: finding a truly great gluten free bagel can feel like searching for a unicorn. Too often, they’re dense, crumbly, or taste more like a hockey puck than a breakfast treat. But my friends, that ends today. I’ve cracked the code on creating homemade gluten free bagels that are actually chewy, flavorful, and have that classic, satisfying bite we all crave. This recipe is a game-changer for busy weekdays, leisurely weekend brunches, or any time you need a comforting, carb-y hug.
Table of Contents
Table of Contents
Why You’ll Love These Gluten Free Bagels
- Surprisingly Simple: Don’t let the thought of homemade bagels intimidate you! This process is broken down into easy, manageable steps.
- Incredibly Chewy Texture: Thanks to a few secret weapons (hello, psyllium husk!), these bagels boast that iconic bagel chew.
- Perfect for Meal Prep: Make a batch on Sunday and enjoy them all week long—they freeze beautifully!
- Totally Customizable: Top them with everything bagel seasoning, sesame seeds, or keep them plain and simple. The choice is yours!
Ingredients for Your the first step to bagel bliss. Here’s what you’ll need:
Print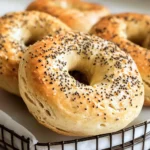
Gluten Free Bagels
- Total Time: 45 minutes
- Yield: 6 bagels 1x
Description
Gluten-free bagels recipe: Easy, delicious & homemade. Perfect texture with simple ingredients. Bake tasty gf breakfast or snack today.
Ingredients
Instructions
Notes
An easy recipe for homemade gluten-free bagels that are surprisingly chewy, flavorful, and have the perfect satisfying bite. Perfect for a quick breakfast or weekend brunch.
- Prep Time: 15 minutes
- Cook Time: 30 minutes
- Category: Breakfast
- Cuisine: American
Nutrition
- Serving Size: 6 bagels
- Calories: 210 kcal
- Sugar: 10 g
- Fat: 6 g
- Carbohydrates: 35 g
- Fiber: 5 g
- Protein: 5 g
- 2 cups (280g) gluten-free all-purpose flour blend (with xanthan gum)
- 1 tbsp baking powder
- 1 tsp salt
- 2 tbsp psyllium husk powder
- 1 cup warm water
- 1 tbsp maple syrup or honey
- 1 large egg, beaten (or flax egg for vegan)
- 2 tbsp olive oil or melted butter
For the water bath:
- 8 cups water
- 1/4 cup maple syrup or honey
For topping (optional):
- Everything bagel seasoning, sesame seeds, poppy seeds, etc.
Step-by-Step Instructions
- Prep the Dough: In a large bowl, whisk together your gluten-free flour, baking powder, salt, and psyllium husk powder. In a separate jug, combine the warm water, maple syrup, egg, and oil. Pour the wet ingredients into the dry and mix with a spatula until a shaggy dough forms. It will be sticky!
- Knead It: Let the dough rest for 2 minutes—this allows the psyllium husk to work its magic and absorb the liquid. Then, with oiled hands, knead the dough right in the bowl for about 2-3 minutes until it becomes smooth and pliable.
- Shape the Bagels: Divide the dough into 6 equal pieces. Roll each piece into a ball. Poke your finger through the center of each ball and gently stretch it to form a bagel shape with a decent-sized hole (it will close up a bit as it bakes). Place them on a parchment-lined baking sheet.
- Boil the Bagels: Preheat your oven to water to a gentle boil and add the 1/4 cup of maple syrup. Carefully lower each bagel into the water using a slotted spoon. Boil for 60 seconds, flip, and boil for another 60 seconds. This step is non-negotiable for that classic chewy crust!
- Bake to Perfection: Place the boiled bagels back on the baking sheet. Brush the tops with a little beaten egg or olive oil and sprinkle on your desired toppings. Bake for 25-28 minutes, or until golden brown and firm to the touch. Let them cool on a wire rack for at least 15 minutes before slicing—this is the hardest part, but it’s worth the wait!

My Go-To Bagel Making Equipment
You don’t need anything too fancy! A good baking sheet, some parchment paper, a large pot for boiling, and a slotted spoon are the main players here. A kitchen scale is also super helpful for measuring your gluten free flour accurately, which can make a big difference in baking.
Tips & Tricks for Bagel Success
I’ve made a lot of bagels in my day, and here’s what I’ve learned: First, don’t skip the psyllium husk! It’s the key to getting that stretchy, chewy texture that gluten free baked goods often lack. Second, make sure your water for boiling is at a gentle boil, not a raging one—you don’t want the bagels to fall apart. And finally, for a softer bagel, you can brush them with melted butter right when they come out of the oven. It’s a little trick my grandma taught me!
The Best Ways to Serve These Bagels
The possibilities are endless! Slice one in half, toast it until golden, and slather it with cream cheese, maybe with a sprinkle of everything seasoning on top. They also make the absolute best breakfast sandwiches. Just add a fried egg, a slice of cheese, and maybe a piece of avocado. Honestly, they’re so good you might just eat them plain. If you’re looking for a sweet pairing, my Vibrant Berry Blast Smoothie is the perfect companion.
A Quick Look at the Nutrition
While these are definitely a treat, it’s nice to know what you’re enjoying! Per bagel (approximate): Calories: 210, Fat: 6g, Carbs: 35g, Fiber: 5g, Protein: 5g. The exact numbers will vary based on your specific flour blend and toppings.
There you have it! Homemade gluten free bagels that don’t just look the part—they taste incredible. This recipe proves that with a little patience and the right ingredients, you can enjoy all your favorite foods, no matter your dietary needs. I’d love to hear how your batch turns out! Tag me on social media so I can see your beautiful, chewy creations.
Your Gluten Free Bagel Questions, Answered
Can I make these bagels vegan?
Absolutely! For a vegan version, simply swap the egg for a “flax egg” (1 tbsp ground flaxseed mixed with 3 tbsp water, let sit for 5 mins) and use maple syrup instead of honey in the dough and water bath. The results are just as fantastic.
How should I store leftover bagels?
Once completely cool, store them in an airtight container or bag at room temperature for 2-3 days. For longer storage, I highly recommend slicing them first and freezing them. Then you can pop a frozen slice right into the toaster!
What’s the best gluten-free flour blend to use?
I’ve had great success with blends that include a mix of flours and starches, like those from Bob’s Red Mill or King Arthur. The key is to use a blend that already contains xanthan gum, as it helps with structure. For more on this, check out this great guide on understanding gluten-free flours.
Can I make the dough ahead of time?
You can! After shaping the bagels, place them on the baking sheet, cover tightly with plastic wrap, and refrigerate for up to 12 hours. When you’re ready, simply boil and bake as directed—you might need to add a minute or two to the baking time since they’ll be cold.
More Gluten-Free Favorites You’ll Adore
If you loved this recipe, you’ve got to try my fan-favorite Foolproof Gluten Free Pizza Crust. It’s another weekend game-changer! And for a sweet treat, these Decadent Gluten Free Brownies are always a hit.