
Is there anything more charming than a cookie that looks like a tiny, edible nest? I think not. These Gluten Free Bird’s Nest Cookies have been a springtime staple in my kitchen for years, and they never fail to bring a smile to everyone’s face. They’re the perfect project for a rainy afternoon with the kids or a last-minute treat to bring to an Easter brunch. The best part? They’re incredibly simple to make, requiring no baking and just a handful of ingredients. If you’re looking for a dessert that’s as fun to make as it is to eat, you’ve come to the right place.
Table of Contents
Table of Contents
Why You’ll Love These Gluten Free Bird’s Nest Cookies
Let’s be real, sometimes gluten-free baking can feel like a complicated science experiment. But this recipe is here to change that! Here’s why these little nests will become your new favorite:
- No-Bake & Quick: From bowl to plate in under 30 minutes? Yes, please. Perfect for when a sugar craving strikes unexpectedly.
- Naturally Gluten-Free: Using certified gluten-free ingredients makes these a safe and delightful treat for anyone with celiac disease or a gluten sensitivity.
- Kid-Friendly Fun: Let your little ones shape the nests and place the candy eggs. It’s a wonderful way to create sweet memories together.
- Endlessly Customizable: Don’t have pecans? Use almonds! Prefer milk chocolate? Go for it! This recipe is a fantastic base for your own creative twists.
Gathering Your Ingredients
PrintGluten Free Bird’s Nest Cookies
Learn to make viral gluten-free Bird’s Nest Cookies. Easy recipe using simple techniques. Perfect for Easter, these treats are a festive, delicious hit.
- Prep Time: 15 minutes
- Total Time: 45 minutes
- Yield: 24 cookies 1x
- Category: Dessert
- Cuisine: American
Ingredients
Instructions
Notes
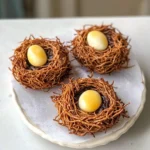
An easy, no-bake recipe for adorable gluten-free bird’s nest cookies, perfect for an Easter treat. Made with simple ingredients like chocolate, peanut butter, and chow mein noodles.
Nutrition
- Serving Size: 24 cookies
- Calories: 180 calories
- Sugar: 14 g
- Fat: 11 g
- Carbohydrates: 20 g
- Fiber: 2 g
- Protein: 3 g
You probably have most of these items in your pantry already. Here’s what you’ll need to create these adorable cookies:
- 1 (12 oz) bag of semi-sweet chocolate chips
- 2 cups miniature marshmallows
- 1/2 cup smooth peanut butter
- 1 teaspoon vanilla extract
- 2 1/2 cups chow mein noodles (check the label to ensure they are gluten-free)
- 1 cup chopped pecans
- 1 bag of candy-coated chocolate eggs (like Cadbury Mini Eggs)
Step-by-Step Instructions
Ready to build your nests? Follow these simple steps for perfect results every time.
Step 1: Melt the Base
In a large, microwave-safe bowl, combine the chocolate chips, marshmallows, and peanut butter. Heat in the microwave in 30-second intervals, stirring well after each burst, until the mixture is completely smooth and melted. This usually takes about 90 seconds total. Stir in the vanilla extract.
Step 2: Combine the Goodies
Gently fold the chow mein noodles and chopped pecans into the melted chocolate mixture. Use a spatula to coat everything evenly. Be patient here—folding gently will help prevent the noodles from breaking too much.
Step 3: Shape the Nests
Drop heaping tablespoonfuls of the mixture onto a baking sheet lined with parchment paper. Using the back of a spoon or your fingers (a little butter on them helps prevent sticking!), gently press down the center of each mound to create a nest-like indentation.
Step 4: Add the Eggs and Chill
While the mixture is still soft, press three or four candy eggs into the center of each nest. Pop the entire baking sheet into the refrigerator for at least 30 minutes, or until the cookies are firm.
Helpful Tips for Perfect Nests
I’ve made a batch or twenty of these over the years, and here are my best tips to guarantee success:
- Don’t Over-Microwave: The key to a smooth texture is melting the chocolate slowly. If you overheat it, the chocolate can seize up and become grainy.
- Work Quickly: The mixture will start to set as it cools, so have your baking sheet ready and shape the nests promptly after mixing.
- Get Creative: These are so versatile! Try using butterscotch chips instead of chocolate, or swap the pecans for shredded coconut. You could even make them with sunflower seed butter for a nut-free version.
- Storage: Keep these cookies stored in an airtight container in the refrigerator. They’ll stay fresh and delicious for up to a week… if they last that long!
What to Serve With Your Cookies
These cookies are a star on any dessert table! They pair wonderfully with a glass of cold milk for the kids or a hot cup of coffee for the adults. For a full spring-themed spread, serve them alongside other easy treats like my Gluten Free Lemon Bars or a refreshing Strawberry Spinach Smoothie to balance the sweetness.
Frequently Asked Questions
Can I make these cookies nut-free?
Absolutely! Simply omit the pecans and use a seed butter, like sunflower seed butter, instead of peanut butter. Just double-check that all your other ingredients, including the chocolate chips, are certified nut-free if you have a severe allergy.
How far in advance can I make these?
You can make these nests up to 3 days in advance. Store them in a single layer in an airtight container in the refrigerator. I don’t recommend freezing them, as the texture of the chow mein noodles can change.
My mixture is too sticky to shape. What should I do?
If the mixture is too sticky, it might need a bit more time to cool down. Pop the whole bowl into the refrigerator for 5-10 minutes to firm up slightly, then try shaping the nests again.
Where can I find gluten-free chow mein noodles?
This can be the trickiest ingredient to find! Look in the international or Asian food aisle of your grocery store, but always read the label carefully. Many major brands, like La Choy, are naturally gluten-free, but it’s always best to confirm. You can also check online retailers or specialty health food stores.
A Sweet Finale
There you have it—the simplest, most delightful Gluten Free Bird’s Nest Cookies that are sure to become a seasonal tradition. They prove that you don’t need a long list of ingredients or hours in the kitchen to create something special. I love how these little cookies capture the joy of spring, and I hope they bring as much happiness to your table as they have to mine. Happy baking!