
Hey there, friends! Let’s talk about cannoli. You know, those magical, crispy pastry tubes filled with sweet, creamy ricotta that transport you straight to a Sicilian cafe with one bite? I’ve always adored them, but for the longest time, they felt like a “special bakery only” kind of treat—especially if you’re navigating a gluten free diet. I’m convinced that missing out on the classics is the hardest part of dietary shifts. After a particularly strong craving hit during the holidays (and a failed attempt to find a decent gluten free version nearby), I rolled up my sleeves. After some delicious trial and error, I’m so excited to share this foolproof recipe for Gluten Free Cannoli. They’re every bit as authentic, crunchy, and delightfully creamy as you remember, and making them at home is a joyful kitchen adventure perfect for a fun weekend project or a show-stopping dessert.
Table of Contents
Table of Contents
Why You’ll Love This Gluten Free Cannoli Recipe
- Surprisingly Simple: Don’t let the fancy look fool you. The dough comes together easily, and the frying is a quick step.
- Authentic Taste & Texture: We use the right gluten free flour blend and technique to get that classic shatteringly crisp shell.
- Endlessly Customizable: Dip the ends in chocolate, pistachios, or rainbow sprinkles. It’s your dessert masterpiece!
- A Labor of Love (That’s Worth It): This is a recipe that creates memories. Invite a friend or get the kids involved in the filling and decorating fun.
Ingredients for Gluten Free Cannoli Shells & Filling
PrintGluten Free Cannoli Recipe
Easy gluten-free cannoli recipe. Learn to make homemade shells & creamy filling. A delicious Italian dessert everyone will love.
- Prep Time: 45 minutes
- Cook Time: 15 minutes
- Total Time: 60 minutes
- Yield: 12 cannoli 1x
- Category: Dessert
- Cuisine: Italian
Ingredients
Instructions
Notes
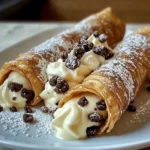
A foolproof recipe for authentic, crunchy, and delightfully creamy Gluten Free Cannoli. This homemade Italian dessert is a perfect show-stopping treat for a gluten free diet.
Nutrition
- Serving Size: 12 cannoli
- Calories: 280 kcal
- Sugar: 14 g
- Fat: 16 g
- Carbohydrates: 28 g
- Fiber: 1 g
- Protein: 6 g
For the Cannoli Shells:
- 1 ¼ cups (175g) high-quality gluten free all-purpose flour blend (I use one with xanthan gum)
- 2 tablespoons granulated sugar
- ½ teaspoon ground cinnamon
- ¼ teaspoon salt
- 2 tablespoons cold unsalted butter, cubed
- 1 large egg yolk
- 3-4 tablespoons dry white wine (or substitute with apple cider vinegar mixed with water)
- 1 quart vegetable or canola oil, for frying
For the Cannoli Filling:
- 1 ½ cups (340g) whole milk ricotta cheese, drained well
- ½ cup (60g) powdered sugar, plus more for dusting
- ¼ teaspoon pure vanilla extract
- ⅛ teaspoon ground cinnamon
- ¼ cup mini chocolate chips
- Optional for decorating: Melted chocolate, chopped pistachios, candied orange peel
Step-by-Step Instructions
- Make the dough: In a large bowl, whisk together the gluten free flour, sugar, cinnamon, and salt. Using a pastry cutter or your fingertips, work the cold butter into the flour until the mixture resembles coarse crumbs. Stir in the egg yolk. Add the white wine, one tablespoon at a time, mixing until a stiff dough forms. Turn it out onto a lightly floured (gluten free flour) surface and knead gently 2-3 times until smooth. Wrap in plastic and let rest at room temperature for 30 minutes.
- Roll and cut: Divide the dough in half. Using a rolling pin and plenty of gluten free flour to prevent sticking, roll one piece out as thinly as possible (about 1/16-inch thick). Use a 4-inch round cutter (a bowl works!) to cut out circles. Re-roll scraps and repeat. You should get 12-14 circles.
- Form the shells: Lightly brush water around the edge of a dough circle. Place a cannoli form diagonally across the center and wrap the dough around it, pressing the wet edge to seal. Set aside covered with a towel. Repeat.
- Fry to perfection: In a heavy, deep pot, heat 2-3 inches of oil to 365°F (185°C). Carefully lower 2-3 shells at a time into the hot oil. Fry for 60-90 seconds, turning once, until golden brown. Use tongs to carefully remove and drain on a paper towel-lined plate. Let cool for a minute, then gently twist the metal form to remove the shell. Let shells cool completely.
- Make the filling: While shells cool, beat the well-drained ricotta, powdered sugar, vanilla, and cinnamon with a hand mixer until smooth and creamy. Fold in the mini chocolate chips. Chill until ready to use.
- Fill and serve: Just before serving, spoon the chilled filling into a piping bag (or a zip-top bag with the corner snipped). Pipe generously into both ends of each cooled shell. Dip the ends in your chosen toppings. Dust with powdered sugar and serve immediately for the best crisp texture.
My Secret Tips for Perfect Cannoli Every Time
First, don’t fear the fry! Getting the oil to the right temperature is key. If you don’t have a thermometer, drop a tiny piece of dough in; it should sizzle and bubble actively. Second, drain your ricotta like your dessert depends on it! For an ultra-smooth, non-grainy filling, place a fine-mesh sieve over a bowl, add the ricotta, cover, and let it drain in the fridge for a few hours or overnight. It makes a world of difference. And my final tip? Cannoli shells are best filled right before eating. If you want to get ahead, make the shells and the filling separately, then assemble your gluten free cannoli just as your guests arrive for that unforgettable “wow” moment. For more dessert prep magic, check out my guide on how to master make-ahead desserts.
Delicious Variations to Try
The beauty of this recipe is in its canvas. Swap the mini chocolate chips in the filling for candied citrus or a sprinkle of orange zest for a bright twist. For a richer flavor, fold a tablespoon of mascarpone into the ricotta filling. If you’re a chocolate lover, add a tablespoon of cocoa powder to the filling and dip the shells in dark chocolate. Kids (and kids-at-heart) love ends dipped in rainbow sprinkles. There are no rules here, only delicious possibilities! If you love playing with flavors, you’ll adore my Decadent Gluten Free Chocolate Tart for another customizable treat.
What to Serve with Your Gluten Free Cannoli
This is the star of the show, so keep companions simple. A strong cup of Italian espresso or a dessert wine like Moscato d’Asti is the classic pairing. For a larger spread, I love serving them alongside a plate of fresh berries and some chewy almond flour cookies. The contrast in textures is wonderful. Presentation-wise, a simple white platter dusted with a little powdered sugar and topped with your beautiful, decorated cannoli looks incredibly professional.
Storing Your Homemade Cannoli
Unfilled shells can be stored in an airtight container at room temperature for up to 3 days. If they lose a little crispness, you can refresh them in a 350°F oven for 3-5 minutes. The filling should always be stored separately in the fridge for up to 3 days. Assemble just before you’re ready to serve for that signature crunch. I do not recommend freezing the filled cannoli, as the shells will become soggy.
Frequently Asked Questions
Can I bake the cannoli shells instead of frying?
For truly authentic cannoli, frying is necessary to achieve that blistered, glass-like crispness. Baking typically results in a more pastry-like texture. However, if you need a baked option, you can try molding the dough around the forms and baking at 375°F until golden, but the texture will differ.
Do I really need cannoli forms?
Yes, for the classic tube shape, metal cannoli forms are essential. They’re an inexpensive investment and can be found online or in kitchenware stores. In a pinch, you could try wrapping the dough around the handle of a wooden spoon to create a wider, shorter shape, but the traditional form gives the best result.
What’s the best gluten free flour blend for this recipe?
Use a blend that’s meant for all-purpose baking and contains a binder like xanthan gum. My go-to brands for this are Cup4Cup or Bob’s Red Mill 1-to-1 Gluten Free Baking Flour. These blends mimic the structure of wheat flour beautifully. You can learn more about choosing the right flour in my article on gluten free baking essentials.
How can I make the filling less grainy?
This is all about the ricotta! Draining it thoroughly, as mentioned in the tips, is the #1 trick. For an even silkier texture, you can press the drained ricotta through a fine-mesh sieve with a spatula or give it a quick blitz in a food processor after draining. Whole milk ricotta tends to be creamier than part-skim.
Ready for a Sweet Adventure?
Making your own Gluten Free Cannoli is such a rewarding experience. That moment you take your first bite of a perfectly crisp shell filled with sweet, creamy ricotta… it’s pure joy. It’s a recipe that proves dietary restrictions don’t mean missing out on life’s sweetest traditions. So, gather your ingredients, put on some Italian music, and cook up some joy. I promise, your kitchen will smell amazing, and you’ll feel like a total pastry rockstar. Don’t forget to tag me on social if you make them—I love seeing your creations!