There’s something magical about a dessert that looks as incredible as it tastes. This article guides you through creating a show-stopping pumpkin marble cake, a perfect fusion of cozy autumn spice and rich, velvety chocolate. We will explore the simple secrets to achieving that perfect marbled effect, share tips for a supremely moist crumb, and provide answers to all your baking questions. Get ready to blend two beloved flavors into one unforgettable treat that will become a new fall tradition.
Table of Contents
Table of Contents
The Story Behind This Festive Pumpkin Marble Cake
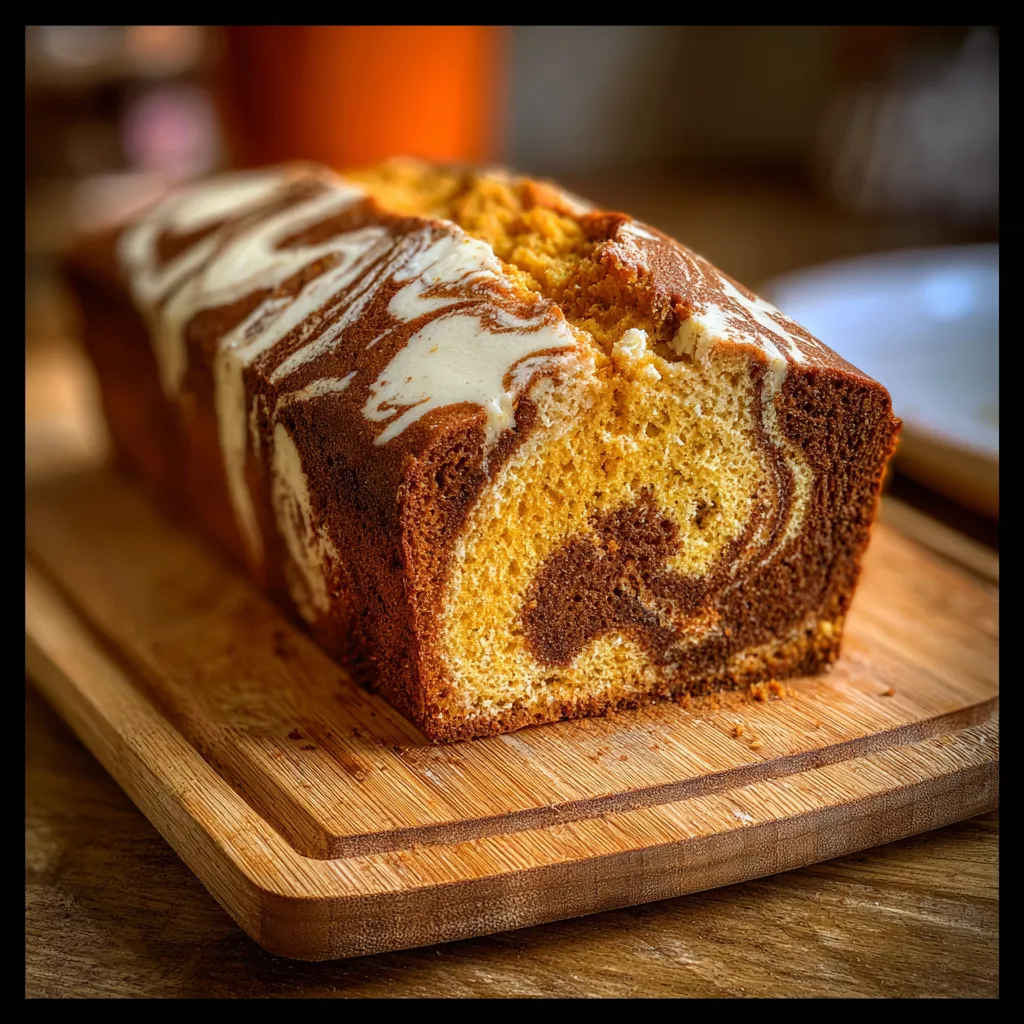
I’ll never forget the first time I saw a pumpkin marble cake sitting proudly on my grandmother’s counter. It was a crisp October afternoon, and the entire house smelled of cinnamon, nutmeg, and melting chocolate—a combination that instantly felt like home. She wasn’t a fancy baker, but she had a way of creating magic in her kitchen. That cake, with its beautiful swirls of orange and brown, looked too impressive to eat. Of course, we devoured it anyway, and with every forkful, I knew this was more than just a dessert; it was a memory in the making.
Print
Pumpkin Marble Cake Recipe Your Stunning Fall Masterpiece
- Total Time: 1 hour 45 minutes
- Yield: 12 servings 1x
Description
Savor fall flavors with our pumpkin marble cake recipe Easy technique yields a stunning marbled look Perfect seasonal dessert for any occasion 146 chars
Ingredients
Instructions
- Prep Time: 20 minutes
- Cook Time: 55 minutes
- Category: Dessert
- Cuisine: American
Nutrition
- Calories: 380 kcal
- Sugar: 32 g
- Fat: 18 g
- Carbohydrates: 52 g
- Fiber: 2 g
- Protein: 5 g
Why a Marbled Swirl Works So Well
What makes this particular pumpkin marble cake so special is the contrast. The pumpkin batter brings incredible moisture and a warm, spiced flavor profile that sings of autumn. Paired with a deep, dark chocolate batter, each bite becomes a delightful surprise. You never know if you’ll get more spice or more chocolate, and that element of excitement is what keeps everyone coming back for another slice. It’s a fantastic way to enjoy the best of both worlds.
A Dessert That Feels Like a Celebration
Furthermore, this cake feels celebratory. Its beautiful appearance makes it look like you spent hours on intricate decoration, when in reality, the marbling technique is simple and fun. It’s a fantastic recipe to bake with kids, letting them create the swirls themselves. Whether you’re serving it at a potluck, a holiday dinner, or just as a weekend treat, this pumpkin marble cake always feels like an occasion.
Gathering Your Ingredients for the Perfect Bake
Success in baking always starts with quality ingredients. For a moist and flavorful pumpkin marble cake, using the right components makes all the difference. First, let’s talk pumpkin. Always opt for pure canned pumpkin puree, not pumpkin pie filling, which contains added sugars and spices. This ensures you have complete control over the flavor of your final cake. The natural sweetness and moisture from the puree are key to achieving that tender crumb we all love.

The Role of Fats and Leaveners
Your choice of fat impacts the cake’s texture. Using oil instead of butter in the pumpkin batter guarantees an exceptionally moist cake that stays soft for days. Meanwhile, the chocolate portion can use either oil or melted butter. For leavening, a combination of baking soda and baking powder ensures both batters rise evenly in the oven, creating a uniform cake with a perfect dome. Always check that your leaveners are fresh for the best rise.
Pulling the Two Batters Together
Finally, the structure comes from flour and eggs. All-purpose flour provides the ideal foundation. Be sure to measure it correctly by spooning it into the measuring cup and leveling it off. Over-measuring flour is a common mistake that leads to a dry cake. Large eggs bind everything together and contribute to the cake’s structure. Having all your ingredients at room temperature before you start mixing is a simple step that helps them emulsify better, resulting in a smoother, more cohesive batter.
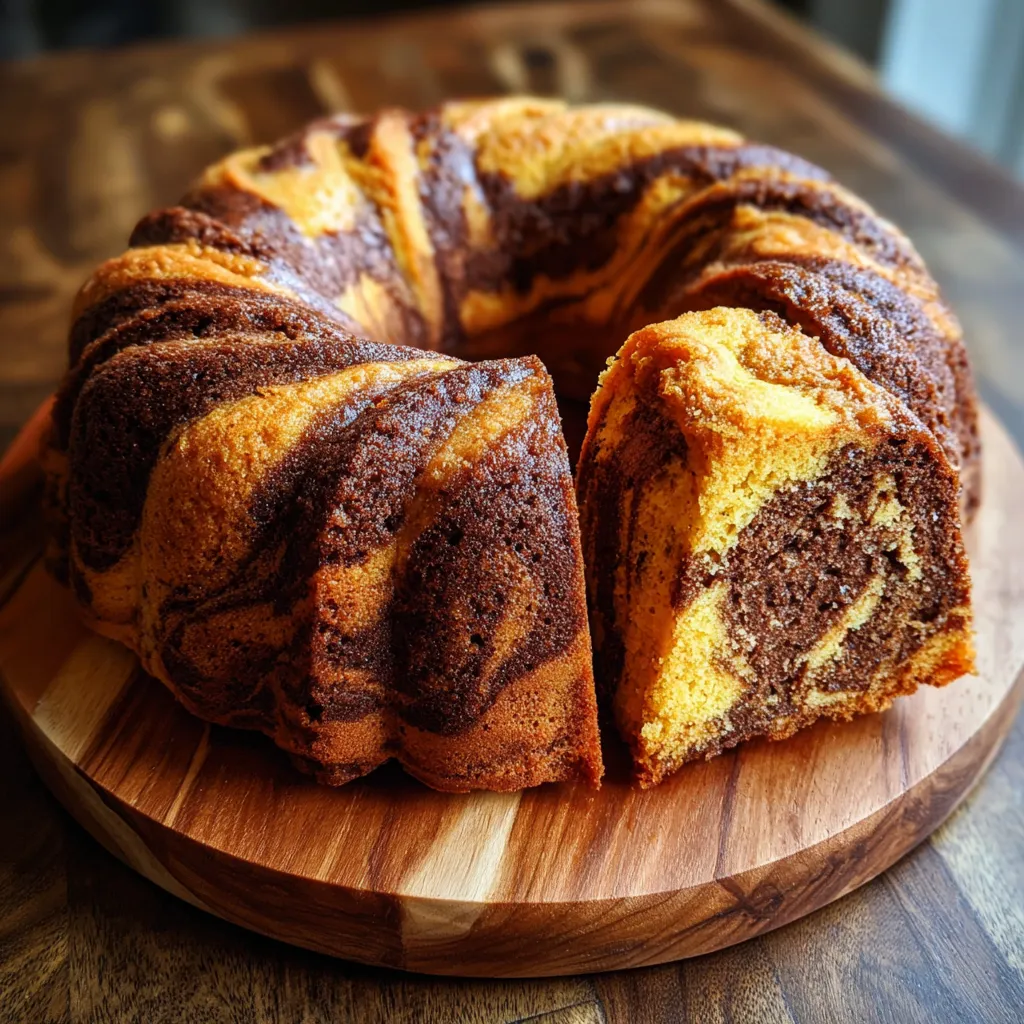
Mastering the Marbling Technique Step-by-Step
The magic of this cake happens when you combine the two batters. The process is straightforward, but a few key tips will ensure you get those beautiful, defined swirls. Begin by preparing your pans. Grease and flour two 9-inch round cake pans or a large 10-cup Bundt pan thoroughly. This crucial step prevents sticking and ensures your beautiful creation releases perfectly after baking. Preheat your oven to 350°F (175°C) so it’s ready to go when you are.
Layering for Maximum Effect
Here’s where the fun begins. Using a large spoon or scoop, alternate adding dollops of the pumpkin batter and the chocolate batter into your prepared pan. Don’t worry about making it neat; random placement creates the best swirls. Once all the batter is in the pan, take a thin knife or a long skewer and gently swirl it through the batters in a figure-eight pattern. Only swirl 4-5 times; over-mixing will muddy the distinct flavors and you’ll lose the beautiful contrast. For more tips on layering, check out our guide on how to marble a cake.
Baking to Perfection
Place the pan in the center of your preheated oven and bake. Cake pans typically take 30-35 minutes, while a dense Bundt pan may need 50-60 minutes. The cake is done when a toothpick inserted into the center comes out with a few moist crumbs attached. Avoid overbaking, as this will dry out your pumpkin marble cake. Let the cake cool in the pan on a wire rack for at least 20 minutes before inverting it to cool completely. This patience prevents it from breaking apart.
Finishing Touches and Serving Suggestions
A perfectly baked pumpkin marble cake is a masterpiece on its own, but a simple glaze or frosting elevates it to sheer perfection. For a Bundt cake, a glossy vanilla or chocolate glaze drizzled over the top highlights its beautiful shape and swirls. A simple powdered sugar glaze made with milk or orange juice complements both flavors wonderfully. If you’ve baked layer cakes, consider a cream cheese frosting—its tangy sweetness is a classic pairing with both pumpkin and chocolate.
Storing for Lasting Freshness
Thanks to the oil and pumpkin, this cake stays incredibly moist for days. To keep it at its best, store it in an airtight container at room temperature for up to 3 days. For longer storage, you can refrigerate it for up to a week, though bring it to room temperature before serving for the best flavor and texture. This pumpkin marble cake also freezes beautifully. Wrap cooled cake slices or the whole cake tightly in plastic wrap and then foil. It will keep in the freezer for up to 3 months. Thaw overnight in the refrigerator.
The Ultimate Crowd-Pleasing Dessert
Ultimately, this pumpkin marble cake is more than just a recipe; it’s a guaranteed success. Its stunning appearance impresses guests, while the familiar flavors make everyone feel comforted and happy. It’s the perfect dessert to bring to any autumn potluck or holiday party. For another great fall baking project, try our recipe for easy apple crisp. Whether you’re a seasoned baker or a beginner, this cake is approachable and rewarding. It’s a celebration of the season in every slice.
Frequently Asked Questions
Can I use fresh pumpkin puree instead of canned?
Absolutely! You can definitely use homemade pumpkin puree. Just make sure it’s very thick and has a similar consistency to the canned variety. If your fresh puree is too watery, strain it in a cheesecloth to remove excess liquid. This step prevents your pumpkin marble cake batter from becoming too thin.
Why did my chocolate and pumpkin batters combine too much?
This usually happens if the batters are over-swirled. Remember, less is more when marbling. Use a knife or skewer and make only a few figure-eight passes through the batter. Also, ensure your two batters have a similar thickness so one doesn’t sink into the other before baking.
Can I make this pumpkin marble cake into cupcakes?
Yes, this recipe adapts wonderfully to cupcakes. Divide the batters evenly among lined muffin cups, adding a dollop of each and swirling gently. Bake at the same temperature for 18-22 minutes, or until a toothpick comes out clean. They make perfect portable treats!
What is the best way to grease a Bundt pan for this cake?
To ensure a clean release, use a pastry brush to coat every nook and cranny of the Bundt pan with softened butter or non-stick baking spray. Then, dust the pan lightly with flour, tapping out any excess. This method is the best insurance policy against sticking.
My cake is browning too quickly. What should I do?
If you notice the top of your cake browning too fast, tent it loosely with a piece of aluminum foil for the remainder of the baking time. This will shield it from direct heat and allow the center to bake through without the exterior burning.