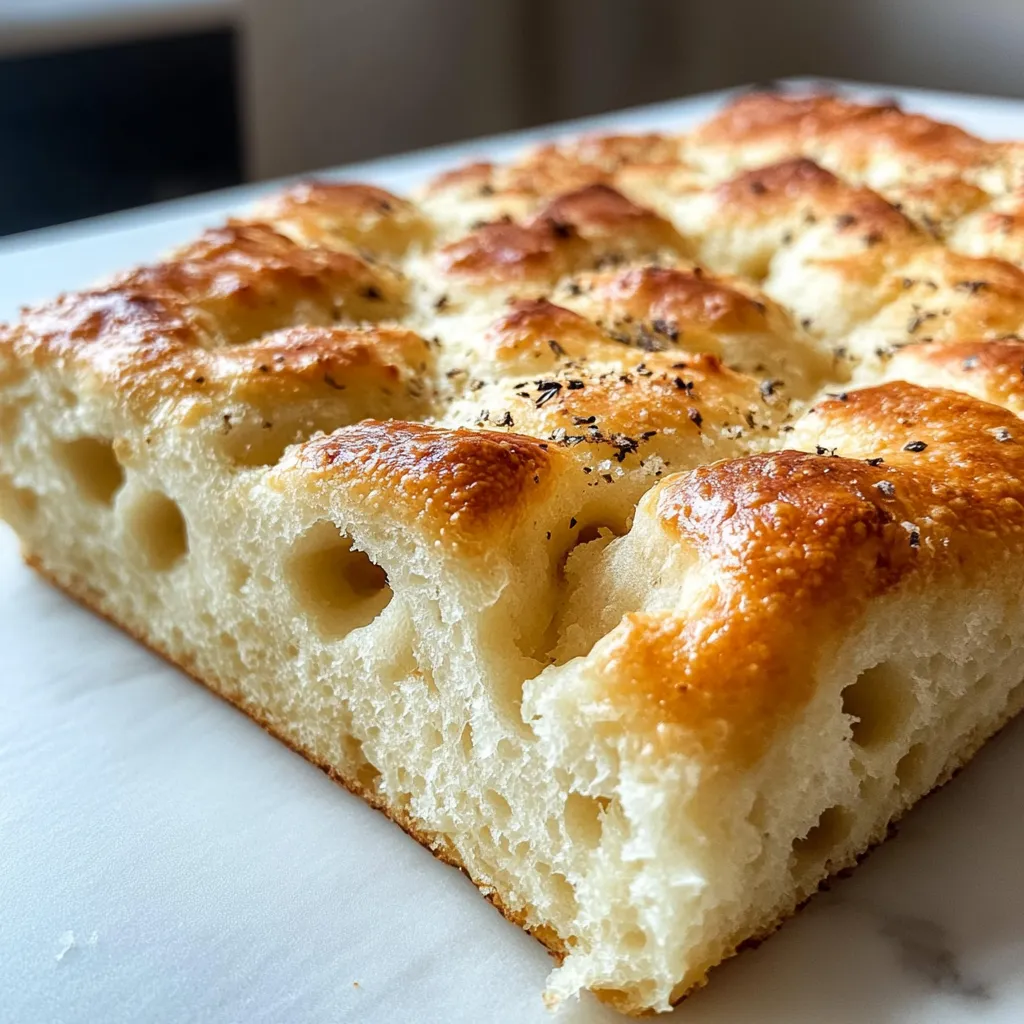
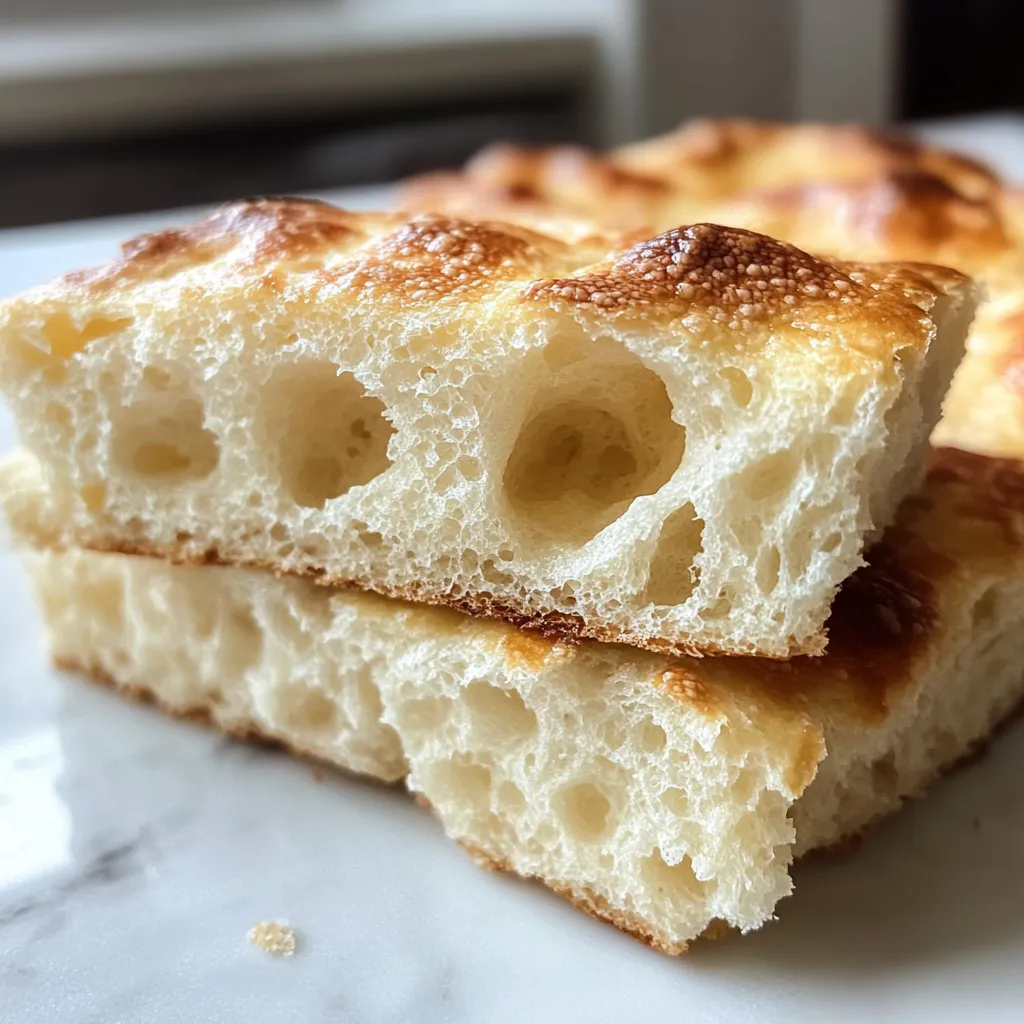
Ever feel like gluten-free baking is a one-way ticket to Dense-and-Dry Town? I’ve been there, my friend. For the longest time, I thought a light, airy, and truly delicious gluten-free focaccia was just a beautiful, unattainable dream. Then, after what felt like a hundred kitchen experiments (my family was very patient taste-testers!), I finally cracked the code. This Cloud-Like Gluten-Free Focaccia is so soft, so pillowy, and so full of those signature dimples and olive oil flavor, you won’t believe it’s missing gluten. It’s the perfect centerpiece for a soup night, a game-changing sandwich bread, or just a fantastic snack you can tear apart with your hands. Let’s make some magic.
Why You’ll Love This Gluten-Free Focaccia
- It’s Surprisingly Simple: No fancy techniques required. If you can stir and poke dough with your fingers, you’re already a pro.
- The Texture is Everything: We’re talking a crispy, golden bottom that gives way to an incredibly soft and airy interior. It’s a true texture triumph.
- Totally Customizable: This is your blank canvas! Top it with fresh rosemary and sea salt, sun-dried tomatoes, or even a sprinkle of everything bagel seasoning.
- It Feels Like a Treat: Let’s be honest, sometimes gluten-free staples can feel a bit… utilitarian. This focaccia is a celebratory bread that feels special.
Ingredients
For the Dough:
PrintCloud-Like Gluten-Free Focaccia Recipe Light
Light cloudlike gluten-free focaccia recipe Easy dairy free tech for perfect results Youll love this fluffy artisan style bread
- Prep Time: 15 minutes
- Cook Time: 25 minutes
- Total Time: 1 hour 40 minutes
- Yield: 1 focaccia (about 12 servings) 1x
- Category: Bread
- Cuisine: Italian
Ingredients
- 2 cups (280g) high-quality gluten-free all-purpose flour blend
- 1 packet (2 1/4 tsp) instant yeast
- 1 tsp fine sea salt
- 1 tsp sugar
- 1 1/4 cups warm water (about 105-110°F)
- 3 tbsp extra virgin olive oil
- 2–3 tbsp extra virgin olive oil (for topping)
- Flaky sea salt (for topping)
- Fresh rosemary sprigs (for topping)
Instructions
- In a large bowl, whisk together the gluten-free flour, instant yeast, salt, and sugar.
- Create a well in the center of the dry ingredients and pour in the warm water and 3 tablespoons of olive oil. Mix until a sticky, shaggy dough forms.
- Generously drizzle a 9×13 inch baking pan with olive oil. Scrape the dough into the pan and use oiled hands to press it evenly into the corners.
- Loosely cover the pan and place it in a warm, draft-free spot to rise for 45-60 minutes, until puffy and nearly doubled.
- Preheat oven to 425°F (220°C). Oil your fingers and press deep dimples into the dough. Drizzle with the remaining olive oil and sprinkle with flaky sea salt and rosemary.
- Bake for 20-25 minutes, until the top is deep golden brown and the edges are pulling away from the pan.
- Let cool in the pan for 10 minutes before transferring to a wire rack. Slice and enjoy while warm.
Notes
A light, airy, and pillowy gluten-free focaccia recipe that is simple to make and perfect for soups, sandwiches, or snacks.
Nutrition
- Serving Size: 1 focaccia (about 12 servings)
- Calories: 180 calories
- Sugar: 1 g
- Fat: 7 g
- Carbohydrates: 26 g
- Fiber: 2 g
- Protein: 3 g
- 2 cups (280g) high-quality gluten-free all-purpose flour blend (I recommend one with xanthan gum already included, like Bob’s Red Mill 1-to-1)
- 1 packet (2 1/4 tsp) instant yeast
- 1 tsp fine sea salt
- 1 tsp sugar
- 1 1/4 cups warm water (about 105-110°F)
- 3 tbsp extra virgin olive oil, plus more for the pan
For Topping:
- 2-3 tbsp extra virgin olive oil
- Flaky sea salt
- Fresh rosemary sprigs
Step-by-Step Instructions
- In a large bowl, whisk together the gluten-free flour, instant yeast, salt, and sugar. This ensures our yeast and seasonings are evenly distributed throughout the flour.
- Create a well in the center of the dry ingredients and pour in the warm water and 3 tablespoons of olive oil. Using a wooden spoon or a spatula, mix until a sticky, shaggy dough forms. It will look more like a thick batter than a traditional bread dough—this is perfect!
- Generously drizzle a 9×13 inch baking pan with olive oil. Scrape the dough directly into the oiled pan. Using oiled hands, gently press and nudge the dough to spread it evenly into all four corners of the pan. Don’t fight it too much; it will spread more as it rises.
- Loosely cover the pan with a clean kitchen towel or plastic wrap and place it in a warm, draft-free spot to rise for 45-60 minutes. You’re looking for it to look puffy and nearly double in size.
- Once risen, preheat your oven to 425°F (220°C). Now for the fun part: oil your fingers again and press deep dimples all over the surface of the dough. Drizzle the top with the remaining 2-3 tablespoons of olive oil, letting it pool in those beautiful dimples. Sprinkle generously with flaky sea salt and fresh rosemary.
- Bake for 20-25 minutes, or until the top is a deep golden brown and the edges are pulling away from the sides of the pan.
- Let it cool in the pan for about 10 minutes before carefully transferring it to a wire rack. This is the hardest part—waiting! But it’s worth it. Slice, tear, and enjoy while it’s still a little warm.
My Best Tips for Success
Your flour blend matters! Using a blend that’s meant for baking (like Cup4Cup or Bob’s Red Mill 1-to-1) will give you the best results. Don’t skip the step of oiling your hands—this dough is sticky, and this little trick is a total game-changer. If your kitchen is on the cooler side, let the dough rise in a turned-off oven with the light on for a cozy, draft-free environment. For an extra flavor boost, try infusing your topping olive oil with some garlic and rosemary before drizzling it on.

This recipe became a staple in our house after my niece, who has celiac, looked at me with wide eyes after her first bite and said, “Aunt Em, this is REAL bread.” My heart absolutely melted. It’s recipes like this that remind me why I love sharing food with the people I love.
Serving Suggestions
This focaccia is the ultimate sidekick. It’s phenomenal dipped in a bowl of my Creamy Tuscan Chicken Soup or alongside a big, vibrant Italian Chopped Salad. I also love using leftover squares to make the most incredible gluten-free panini—just split them horizontally, add your favorite fillings, and press until crispy.
Storing Your Leftovers
This bread is best enjoyed the day it’s made, but you can keep it well-wrapped at room temperature for up to 2 days. To revive it, pop a slice in the toaster oven for a few minutes. It also freezes beautifully! Slice it, wrap it tightly in plastic wrap, and freeze for up to 2 months. Thaw at room temperature and reheat to enjoy.
Frequently Asked Questions
Can I use active dry yeast instead of instant yeast?
Absolutely! If you’re using active dry yeast, you’ll want to proof it first. Just dissolve it and the sugar in the warm water and let it sit for 5-10 minutes until it becomes foamy. Then, add it to the flour mixture with the oil and proceed with the recipe.
My dough didn’t rise very much. What happened?
This can happen if your yeast is old or if the water was too hot and killed the yeast. Always check the expiration date on your yeast and use a thermometer to ensure your water is just warm to the touch, not hot. A cold, drafty kitchen can also slow down the rise.
What can I use if I don’t have a 9×13 inch pan?
No problem! A large cast-iron skillet or a similar-sized oven-safe skillet works wonderfully. Just adjust the baking time accordingly, as a thicker focaccia might need a few extra minutes.
Can I make this dough dairy-free?
You’re in luck! This recipe is naturally dairy-free as written. Just double-check your specific gluten-free flour blend to make sure it doesn’t contain any dairy-derived ingredients.
There you have it—a Cloud-Like Gluten-Free Focaccia Recipe that truly lives up to its name. It’s proof that going gluten-free doesn’t mean giving up on soft, beautiful, and utterly delicious bread. I hope this recipe brings as much joy and satisfaction to your kitchen as it has to mine. Now, go forth and make those dimples! And if you do, I’d love to hear about it. Happy baking!