There is something truly magical about the aroma of baked apples, cinnamon, and nutmeg that fills your kitchen. It speaks of cozy autumn afternoons, family gatherings, and the simple joy of a homemade dessert. For those following a gluten-free diet, that experience doesn’t have to be a thing of the past. This guide will walk you through crafting the ultimate gluten free apple crisp, a dessert so delicious that no one will guess it’s free of gluten. We will explore the secret to a perfect crunchy topping, how to choose the best apples for baking, and the simple techniques that guarantee a bubbly, golden-brown finish every single time.
Table of Contents
Table of Contents
The Heartwarming Appeal of a Classic Dessert
I remember my grandmother’s apple crisp, a humble Pyrex dish arriving at the table, steam rising to mingle with the chatter of my family. The simple oat topping gave way to tender, spiced fruit underneath, a perfect end to a Sunday dinner. When I had to adopt a gluten-free lifestyle, I feared that particular brand of comfort was lost forever. My first several attempts at a gluten free apple crisp were, to put it kindly, learning experiences. The topping turned out sandy one time, soggy the next. But through a little experimentation, I discovered that a great crisp isn’t about wheat flour; it’s about texture, flavor, and love.
Print
Irresistible Gluten Free Apple Crisp Recipe Delicious Easy
- Total Time: 1 hour 10 minutes
- Yield: 8 servings 1x
Description
Savor a delightful glutenfree apple crisp with our easy recipe Enjoy a sweet crunchy dessert made with simple ingredients Perfect glutenfree treat everyone loves
Ingredients
Instructions
- Prep Time: 20 minutes
- Cook Time: 50 minutes
- Category: Dessert
- Cuisine: American
Nutrition
- Calories: 320 calories
- Sugar: 36 g
- Fat: 12 g
- Carbohydrates: 54 g
- Fiber: 5 g
- Protein: 3 g
Why This Dessert is a Crowd-Pleaser
What makes an apple crisp such a perennial favorite? First, it’s incredibly forgiving. Unlike a pie that demands a perfectly flaky crust, a crisp celebrates a more rustic, straightforward approach. The fruit doesn’t need to be meticulously arranged; you simply toss it in a bowl and spread it out. The topping comes together in minutes with a fork or your fingers. This simplicity makes it an ideal project for novice bakers and a quick, satisfying treat for seasoned pros. Furthermore, its warm, spiced flavor profile feels like a hug in a bowl, making it the ultimate comfort food for chilly evenings and holiday feasts alike.
Embracing Gluten-Free Without Sacrifice
Transitioning this classic to a gluten-free version requires a thoughtful approach to the topping. The goal is to achieve that signature crunch and craggy texture that soaks up the juicy apple filling. By using a blend of gluten-free oats and a reliable all-purpose gluten-free flour, you create a base that mimics the original perfectly. The key is to ensure your oat supplier guarantees they are certified gluten-free, as oats are often cross-contaminated with wheat during processing. With this one simple swap, you open up a world of dessert possibilities that are safe for everyone to enjoy, proving that dietary restrictions never have to mean missing out.
Selecting Your Ingredients for Maximum Flavor
The difference between a good crisp and a great one almost always comes down to the ingredients. Choosing the right components will elevate your dessert from simple to sublime, ensuring every bite is a perfect balance of sweet, tart, and spice.
The Best Apples for Baking
Not all apples are created equal, especially when it comes to baking. You want varieties that hold their shape and offer a balance of sweet and tart flavors. Granny Smith apples are a popular choice for their firm texture and bright acidity, which cuts through the sweetness of the topping. For a more complex flavor, try combining two or three different types. For instance, pairing tart Granny Smith with sweeter, fragrant varieties like Honeycrisp or Fuji creates a deeply nuanced filling. Using a mix of apples is one of the easiest professional tricks for building a more interesting and delicious gluten free dessert.
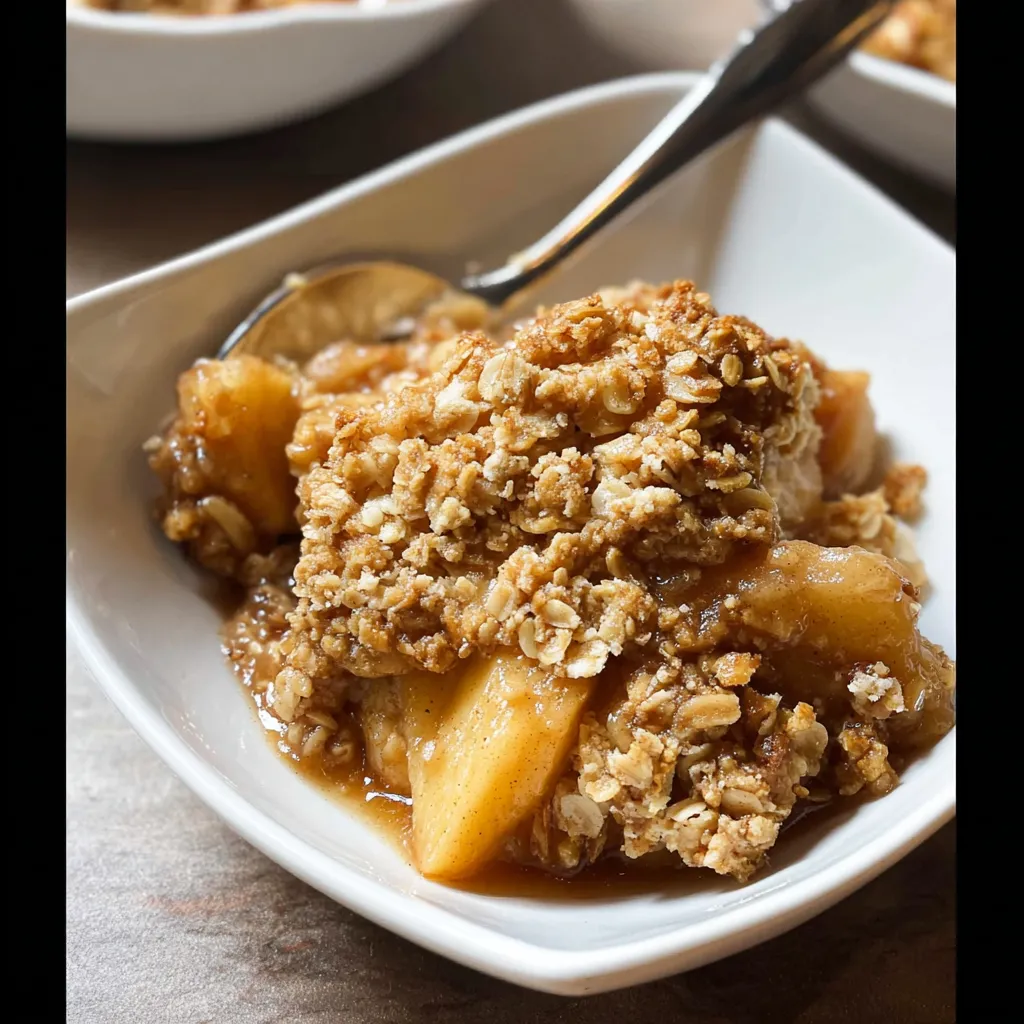
Building the Perfect Gluten-Free Topping
The crowning glory of any crisp is its crumbly, buttery topping. For a gluten free apple crisp, we achieve this with old-fashioned rolled oats and a high-quality gluten-free flour blend. Look for a 1:1 all-purpose blend that includes binders like xanthan gum, which helps the streusel hold together. The fat is crucial; cold, cubed butter is rubbed into the dry ingredients to create those desirable pea-sized crumbs that bake up crisp. For added depth, a touch of chopped nuts like pecans or almonds introduces a wonderful toastiness and extra crunch. This combination guarantees a satisfying texture that complements the soft fruit beneath it perfectly.
Crafting Your Gluten Free Masterpiece
Now for the fun part: bringing it all together. The process is wonderfully hands-on and fills your home with an incredible aroma that builds anticipation for the delicious dessert to come.
Preparing the Filling for Success
Start by peeling, coring, and slicing your apples uniformly, about 1/4-inch thick. Consistent sizing ensures they cook evenly. Toss the apple slices with lemon juice to prevent browning and enhance their natural flavor. Then, add your sweeteners and spices. A combination of brown sugar and a touch of granulated sugar caramelizes beautifully, while cinnamon and a pinch of nutmeg provide that classic warmth. A tablespoon of your gluten-free flour or cornstarch is the final crucial element; it thickens the juiciest apples into a luxuriously glossy sauce rather than a watery pool. For an extra layer of flavor that will make your autumn recipes stand out, consider a drop of vanilla extract or a dash of cardamom.
Creating the Irresistible Crumb Topping
In a separate bowl, whisk together your gluten-free oats, gluten-free flour blend, and brown sugar. The real secret here is to use very cold butter. Cut it into small pieces and use a pastry cutter, two forks, or your fingertips to work it into the dry ingredients. Stop when the mixture resembles coarse crumbs with some larger, pebble-sized pieces—this variety in size gives the topping its fabulous texture. Do not overmix, as this can warm the butter and lead to a denser, greasier topping. Sprinkling this mixture evenly over your apple filling is the final step before baking.
Baking and Serving Like a Pro
The transformation in the oven is where the magic happens. The fruit softens and bubbles, the sugars caramelize, and the topping turns a glorious golden brown.
Achieving the Perfect Bake
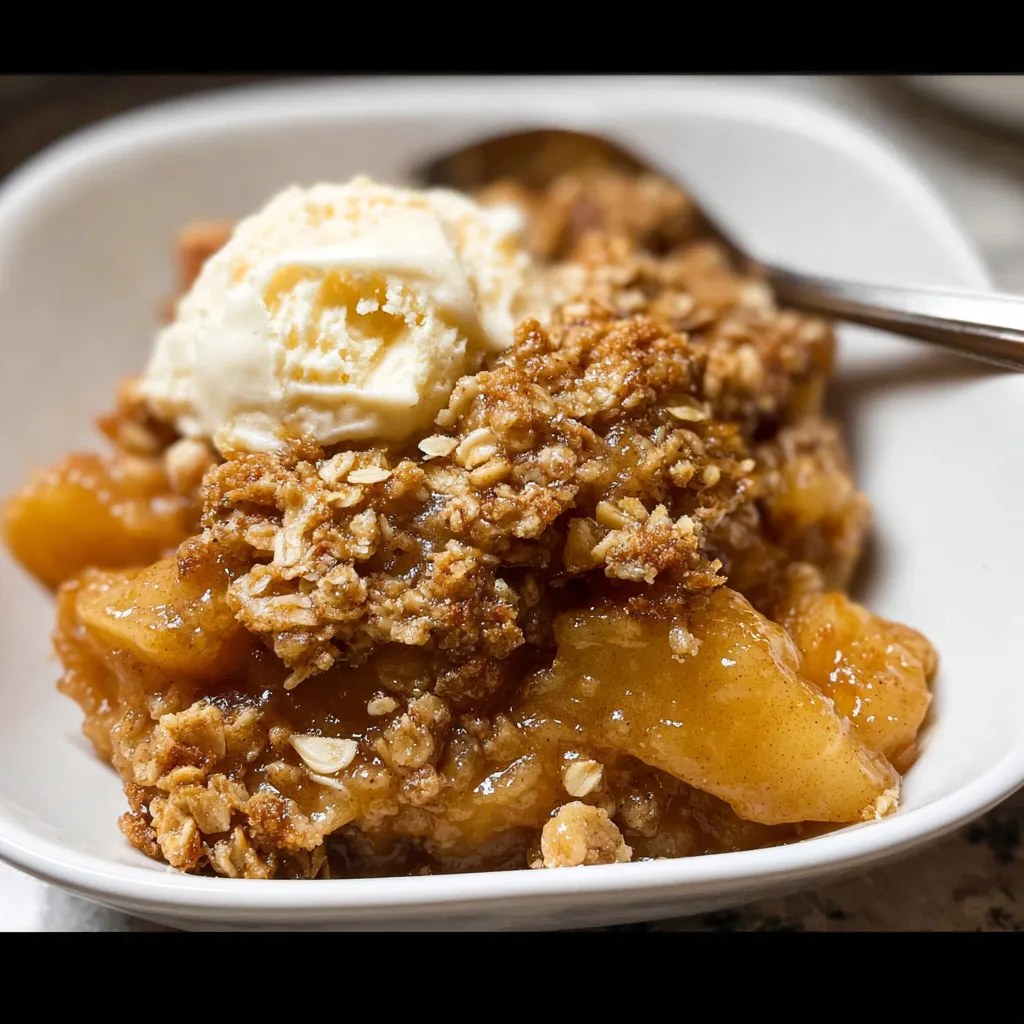
Preheat your oven to 350°F (175°C). Baking your crisp in a moderately hot oven allows the apples to become perfectly tender without the topping burning. Place your baking dish on a rimmed baking sheet to catch any potential bubbling over, which keeps your oven clean. Bake for 45 to 55 minutes, or until the filling is bubbling vigorously around the edges and the topping is firm and golden. If you notice the top browning too quickly, a loose tent of aluminum foil will protect it while the apples finish cooking. That moment you pull a perfectly baked gluten free comfort food from the oven is a true accomplishment.
The Art of Serving Warm Comfort
Resist the urge to dive in immediately! Let the crisp rest for at least 15-20 minutes after pulling it from the oven. This resting period allows the bubbling filling to thicken slightly, making it much easier to serve. While it is delicious on its own, a scoop of cold vanilla ice cream or a dollop of freshly whipped cream creates a sublime contrast of temperatures and textures. The ice cream slowly melts into the warm, spiced apples, creating its own creamy sauce. This dessert is best enjoyed the day it’s made, but any leftovers reheat wonderfully in the oven for a taste of comfort the next day.
Frequently Asked Questions
Can I make this gluten free apple crisp ahead of time?
Absolutely! You can prepare the apple filling and the crumble topping separately up to two days in advance. Store the filling covered in the refrigerator and keep the topping in an airtight container in the fridge. When you’re ready to bake, simply assemble the crisp and pop it in the oven. You may need to add a few extra minutes to the baking time if the components are very cold.
What’s the best gluten-free flour to use for the topping?
A store-bought 1:1 gluten-free all-purpose baking blend that includes a binder like xanthan gum works best for consistency and reliability. Brands like Bob’s Red Mill and King Arthur Measure for Measure are excellent choices as they are specifically formulated to mimic the structure of wheat flour in recipes like crisps and crumbles.
Can I use frozen apples instead of fresh?
You can, but be aware that frozen apples will release significantly more liquid during baking. If using frozen, do not thaw them first. Toss them directly with the sugar, spices, and an extra tablespoon of gluten-free flour or cornstarch to help manage the additional juice and prevent a soupy filling.
Is this recipe dairy-free as well?
This specific recipe uses butter, but it’s easy to make it dairy-free. Simply substitute the butter in the topping with an equal amount of hardened coconut oil or a high-quality plant-based butter stick. The result will be a equally delicious and crunchy topping suitable for those avoiding dairy.