Is there anything that says “sunshine and happiness” quite like a cheerful daisy? I don’t think so. And now, you can bring that sunny feeling right into your kitchen with these absolutely adorable Super Cute Daisy Cupcakes. These aren’t your average cupcakes; they’re little edible works of art that are surprisingly simple to create. Perfect for a spring birthday, a Mother’s Day brunch, or just a regular Tuesday that needs a dose of pretty, these cupcakes are guaranteed to bring a smile to everyone’s face.
Table of Contents
Table of Contents
Why You’ll Love These Super Cute Daisy Cupcakes
- Impressively Easy: They look like they came from a fancy bakery, but the technique is totally doable, even if you’re a piping beginner.
- Total Crowd-Pleaser: Kids and adults alike will go crazy for these charming treats. They’re the star of any dessert table.
- Endlessly Customizable: Use your favorite cupcake and frosting flavors, and play with different food coloring for a whole garden of flowers.
- Pure Joy: There’s something genuinely uplifting about baking something so delightful. It’s edible therapy!

Ingredients You’ll Need
Let’s gather our supplies! The beauty of this recipe is that you can use your favorite homemade or store-bought bases.
Print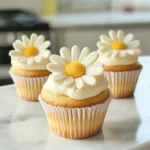
Super Cute Daisy Cupcakes
- Total Time: 50 minutes
- Yield: 12 cupcakes 1x
Description
Bake these super cute daisy cupcakes with our easy tech. Simple steps for adorable, fun treats perfect for any celebration. Impress everyone!
Ingredients
- 12 baked cupcakes, completely cooled
- 1 ½ cups vanilla buttercream frosting
- Yellow and orange gel food coloring
- 1 cup white candy melts or white chocolate chips
- 1 tsp coconut oil or vegetable shortening
- Green gel food coloring (optional, for leaves)
Instructions
- Prepare the Center: Scoop about ½ cup of vanilla frosting into a small bowl. Color it with yellow or orange gel food coloring. Spoon this into a small piping bag fitted with a small round tip (#4).
- Create the Petals: Melt the white candy melts and coconut oil in the microwave until smooth. Let it cool slightly, then transfer to a piping bag fitted with a small leaf tip (#67) or a small round tip (#3).
- Form the Daisies: Pipe daisy shapes onto parchment paper. Pipe small oval petals in a circle to form a flower. Let them set until firm, about 15-20 minutes.
- Frost and Assemble: Frost the cooled cupcakes with the remaining white vanilla buttercream. Gently place a set candy daisy on each cupcake. Pipe a dot of the colored frosting in the center of each daisy.
Notes
Create these adorable and surprisingly easy Super Cute Daisy Cupcakes. They are the perfect sunny, impressive spring treat that looks professional but is simple enough for beginners.
- Prep Time: 30 minutes
- Cook Time: 20 minutes
- Category: Dessert
- Cuisine: American
Nutrition
- Serving Size: 12 cupcakes
- Calories: 320 kcal
- Sugar: 38 g
- Fat: 15 g
- Carbohydrates: 45 g
- Protein: 2 g
- 12 baked cupcakes, completely cooled (I love this Classic Vanilla Cupcake recipe)
- 1 ½ cups vanilla buttercream frosting
- Yellow and orange gel food coloring
- 1 cup white candy melts or white chocolate chips
- 1 tsp coconut oil or vegetable shortening
- Green gel food coloring (optional, for leaves)
Step-by-Step Instructions
Don’t let the fancy look fool you! Follow these simple steps for bakery-worthy results.
- Prepare the Center: Scoop about ½ cup of vanilla frosting into a small bowl. Using a toothpick, add a tiny amount of yellow or orange gel food coloring and mix until you achieve a vibrant, sunny center color. Spoon this into a small piping bag fitted with a small round tip (like a #4), or simply snip a very small corner off a plastic bag. Set aside.
- Create the Petals: In a microwave-safe bowl, combine the white candy melts and coconut oil. Microwave in 20-second bursts, stirring well between each, until completely smooth and runny. Let it cool for a few minutes until it’s still liquid but not super hot. Carefully transfer the melted candy to a piping bag fitted with a small leaf tip (like Wilton #67) or a small round tip (#3).
- Form the Daisies: Lay a piece of parchment or wax paper on a baking sheet. Pipe 12-16 small daisy shapes onto the paper. To do this, pipe a small oval shape for each petal, connecting them in a circle to form a flower. Don’t worry about perfection—daisies are happily irregular! Let the flowers set completely at room temperature until firm, about 15-20 minutes.
- Frost and Assemble: Frost your cooled cupcakes with the remaining white vanilla buttercream, creating a smooth-ish surface. Gently peel your set candy daisies off the parchment paper and place one on top of each cupcake. Finally, pipe a small dot of your yellow or orange frosting in the center of each daisy.

Equipment List
You don’t need anything too fancy! Here’s what will help you succeed:
- Piping bags
- Piping tips (Small round #3 or #4, and a leaf tip #67 is ideal)
- Microwave-safe bowl
- Baking sheet
- Parchment or wax paper
Tips & Variations for the Perfect Daisy
Here are my best tricks to make your flower power cupcakes a roaring success.
- Cooling is Key: Make sure your cupcakes are completely cool before frosting, or you’ll have a melty mess.
- Gel Food Coloring is Best: It provides vibrant color without thinning out your frosting like liquid food coloring can.
- No Piping Tips? No Problem! You can absolutely just snip a tiny corner off a zip-top bag for the center dots. For the petals, a round tip will still make beautiful simple flowers.
- Get Creative: Try using lemon cupcakes with vanilla frosting, or chocolate cupcakes with a cherry buttercream center! Add a touch of green food coloring to a little frosting and pipe on small leaves for an extra touch.
- Make-Ahead Magic: You can make the candy melt daisies days in advance! Just store them in a single layer in an airtight container at room temperature.
Serving Suggestions
Place these beauties on a cake stand and watch them disappear! They pair wonderfully with a cup of coffee at a brunch or a glass of cold milk for an after-school treat. For a full spring-themed spread, serve them alongside some fresh Strawberry Lemonade and other bite-sized desserts.
Nutrition Information
Estimated values per cupcake.
Calories: 320kcal | Carbohydrates: 45g | Protein: 2g | Fat: 15g | Saturated Fat: 7g | Sodium: 120mg | Sugar: 38g
These Super Cute Daisy Cupcakes are more than just a dessert; they’re a little bundle of joy you can create with your own two hands. They prove that with a few simple tricks, you can turn something ordinary into something extraordinary. So, preheat that oven, put on your favorite playlist, and get ready to bake a batch of happiness.
Frequently Asked Questions (FAQ)
Can I use store-bought frosting and cupcakes?
Absolutely! This is a fantastic shortcut for busy days. A box of vanilla cake mix and a tub of vanilla frosting will work perfectly. The decorating is where the magic happens!
My candy melts are too thick. What should I do?
This is a common issue! If your melted candy is too thick to pipe easily, try adding another tiny ¼ tsp of coconut oil and stirring until smooth. This will thin it out to a perfect piping consistency.
How far in advance can I assemble these?
You can assemble the fully frosted cupcakes with the daisy toppers up to a day in advance. Keep them stored in an airtight container at room temperature. I don’t recommend refrigerating them as it can cause the candy decorations to sweat and lose their shine.
Can I use real white chocolate instead of candy melts?
You can, but be cautious. Pure white chocolate can be trickier to melt and may not set as firmly as candy melts, which are designed specifically for decorating. If you use it, make sure to add the coconut oil to help it set properly.