
Oh, the joy of a warm, gooey cinnamon roll! It’s a hug in a bite, isn’t it? But what if you’re avoiding gluten? Don’t worry, my friends! I’ve been there, and I’ve got you covered with this fantastic recipe for Gluten-Free Cinnamon Rolls. This recipe is designed to be easy, so even if you’re not a seasoned baker, you can whip up these delicious rolls. It’s the perfect treat for a lazy weekend morning, a special brunch, or even just a sweet craving that hits you out of the blue. Get ready to impress yourself (and everyone else!) with these amazing rolls.
Why You’ll Love This Recipe
- It’s Gluten-Free: No need to miss out on the deliciousness!
- Easy to Follow: Simple steps, perfect for all skill levels.
- Sweet and Satisfying: Soft, fluffy rolls with a luscious filling and icing.
- Family Favorite: Everyone will be begging for more!
Ingredients
PrintIrresistible Gluten-Free Cinnamon Rolls: A Sweet Treat Made Easy
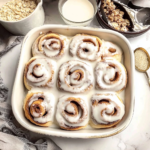
Fluffy gluten-free cinnamon rolls with a spiced brown sugar filling and creamy cream cheese icing. Perfect for lazy mornings or special brunches, these easy-to-make treats are a hit with the whole family.
- Prep Time: 45
- Cook Time: 20
- Total Time: 185
- Yield: 12 rolls 1x
- Category: Gluten-Free
- Method: Baking
- Cuisine: American
- Diet: Vegetarian
Ingredients
1 cup Whole milk, 110°F
3 teaspoons Active dry yeast
1 teaspoon Sugar
2 Eggs
½ cup Vegetable oil
½ cup Sugar
3 ¼ cups Bob’s Red Mill 1:1 Gluten-Free All Purpose Flour
¾ teaspoon Kosher salt
½ teaspoon Baking soda
½ teaspoon Cream of tartar
8 tablespoons Unsalted butter, softened
¾ cup Brown sugar
½ tablespoon Ground cinnamon
4 tablespoons Unsalted butter, room temperature
2 ounces Full-fat cream cheese
1 ¼ cups Powdered sugar
Instructions
Microwave milk to 110°F. Mix with yeast, 1 tsp sugar, and let sit 6 minutes.
Add eggs, oil, and ½ cup sugar. Knead in gluten-free flour, salt, baking soda, and cream of tartar until sticky.
Scrape dough into greased bowl, cover, and let rise 2 hours.
Beat softened butter, brown sugar, and cinnamon for filling.
Roll dough to 12×16 inch rectangle. Spread filling evenly. Roll up, cut into 12 slices, and place in pan.
Cover and rise 15-20 minutes. Bake at 350°F (175°C) for 20-25 minutes until golden.
Mix icing with butter, cream cheese, and powdered sugar. Spread warm rolls with icing.
Notes
Ensure dough reaches 110°F for yeast activation
Let dough rise in a warm, draft-free area
Use gluten-free flour blend labeled for yeast-based baking
Icing hardens quickly; work swiftly
Store leftovers in airtight container at room temperature for 2 days
Nutrition
- Serving Size: 1 roll
- Calories: 250
- Sugar: 15g
- Sodium: 200mg
- Fat: 9g
- Saturated Fat: 5g
- Carbohydrates: 32g
- Fiber: 1.5g
- Protein: 4g
- Cholesterol: 40mg
For the Dough:
- 1 cup Whole milk, 110 degrees
- 3 teaspoons Active dry yeast
- 1 teaspoon Sugar
- 2 Eggs
- ½ cup Vegetable Oil
- ½ cup Sugar
- 3 ¼ cup Bob’s Red Mill 1:1 Gluten Free All Purpose Flour
- ¾ teaspoon Kosher Salt
- ½ teaspoon Baking Soda
- ½ teaspoon Cream of Tartar
For the Filling:
- 8 tablespoons Unsalted butter, softened but not melted
- ¾ cup Brown sugar
- ½ tablespoon Ground cinnamon
For the Icing:
- 4 tablespoons Unsalted butter, room temperature
- 2 ounces Full fat cream cheese A quarter of a block
- 1 ¼ cup Powdered sugar
Step-by-Step Instructions
- Get That Yeast Ready: Preheat your oven to 350 degrees Fahrenheit. Microwave the whole milk until it reaches 110 degrees Fahrenheit. Add active dry yeast and 1 teaspoon of sugar. Let it sit for six minutes while the yeast gets frothy. This is how you know your yeast is alive and ready to make some magic!
- Mix the Dough: Add room temperature eggs, canola oil, and ½ cup of sugar into the yeast mixture and stir well. Pour into the bowl of a stand mixer with the dough hook attachment. Add gluten-free flour, kosher salt, cream of tartar, and baking soda to the bowl. Beat on medium speed for 2 minutes, scraping the bowl after 15 seconds to incorporate all the flour. The dough should be sticky.
- First Rise: Using a spatula, scrape the dough out of the bowl and into a large greased bowl. Brush the top of the dough with oil and cover with saran wrap. Set it aside and let it rise for two hours. This step is crucial for that perfect, pillowy texture.
- Make the Filling: While the dough is rising, stir or beat together 1 stick of softened butter, ¾ cup of brown sugar and one tablespoon of cinnamon. Set it aside. I love this part, the smell of cinnamon always reminds me of the holidays.
- Roll It Out: Sprinkle flour over a large work surface. Once the dough has risen, place it onto the floured area and sprinkle flour onto the dough. Roll it out into a rectangle about 11 by 13 inches long.
- Spread and Roll: Using an offset spatula, spread the butter mixture evenly on the dough, leaving a ¼ inch gap on all sides. Starting with the long side (closest to you), roll the dough up into a log shape.
- Cut the Rolls: Cut the dough log into 9 rolls of a similar size (it doesn’t have to be exact). Each roll becomes a little package of joy!
- Second Rise and Bake: Nestle the rolls into a greased 8×8 inch pan in rows of three. Let them rise for 45 more minutes. Then, bake on the middle rack for 30 to 34 minutes, until the tops are golden brown and the insides are soft but baked.
- Make the Icing: Beat butter on medium speed for 30 seconds. This will ensure the cream cheese and butter emulsify with no lumps, especially if your butter is on the cold side.
- Icing Time: Add cream cheese and beat for 1 more minute. Scrape the bowl with a spatula. Add ¾ cup of the powdered sugar. Beat on low for 5 seconds so the sugar doesn’t poof out of the bowl. Beat on medium high for 1 minute. Add the last ½ cup of powdered sugar and beat on low for 5 more seconds. Beat on medium high for 1 more minute.
- Ice and Enjoy: While the cinnamon rolls are still a little warm, spread them with frosting, leaving any leftovers for those who want extra icing. Enjoy immediately!
Equipment
- Stand Mixer with Dough Hook (or a large bowl and a wooden spoon – if you don’t have a stand mixer)
- 8×8 inch Baking Pan
- Measuring Cups and Spoons
- Rolling Pin
- Spatula
- Offset Spatula (optional)
- Mixing Bowls
Tips & Variations
- Don’t Over-Mix: Be careful not to overmix the dough, especially when using gluten-free flour.
- Spice It Up: Add a pinch of nutmeg or cardamom to the filling for extra warmth.
- Make it Ahead: Prepare the dough and filling the night before and assemble the rolls in the morning. Let them rise while the oven preheats.
- Storage: Store leftover cinnamon rolls in an airtight container at room temperature for up to 2 days, or in the fridge for up to 4 days.
Serving Suggestions
These Gluten-Free Cinnamon Rolls are perfect on their own, but here are a few serving suggestions to make them even more special. Serve them for a weekend brunch, alongside your favorite coffee or tea. They are also delicious with some fresh fruit or a dollop of whipped cream! If you’re looking for other amazing brunch ideas, check out our brunch recipe ideas.
Nutrition Facts
(Nutrition information is an estimate and can vary based on ingredients and brands used.)
- Calories: Approximately 350-400 per roll
- Carbs: Approximately 45-50g per roll
- Protein: Approximately 4-6g per roll
- Fat: Approximately 15-20g per roll
Conclusion
There you have it – a delicious and easy way to enjoy gluten-free cinnamon rolls. Whether you’re making them for a special occasion or just a regular Tuesday, these rolls are sure to bring a smile to your face. So, gather your ingredients, put on some music, and let’s get baking! Don’t forget to share your creations with us on social media using the hashtag #BestDishEasy! Happy baking, friends!
FAQ
Can I substitute a different type of flour?
For the best results, stick with a 1:1 gluten-free all-purpose flour blend, like the one from Bob’s Red Mill, as it’s specifically formulated to mimic the texture of regular flour. Other flours might require adjustments to the liquid ratio, which can affect the final texture of your Gluten-Free Cinnamon Rolls.
How can I make these ahead of time?
You can prepare the dough and filling the night before, assemble the rolls, and then cover the baking dish with plastic wrap. Place them in the refrigerator overnight. In the morning, let them sit at room temperature for about 30 minutes, then bake as directed. This allows the Gluten-Free Cinnamon Rolls to rise beautifully!
How do I store the leftovers?
Store leftover Gluten-Free Cinnamon Rolls in an airtight container at room temperature for up to two days. You can also store them in the refrigerator for up to four days. To reheat, you can microwave them for a few seconds or warm them in the oven.
Can I use a different type of icing?
Absolutely! The classic cream cheese icing is a must-have for the traditional cinnamon rolls. If you’d like a variation, vanilla icing, or maple icing also works. Have fun experimenting with different flavors to personalize your Gluten-Free Cinnamon Rolls.